

Our family has been making kombucha for years and this health-boosting drink is a favorite in our house. Many of my friends and family have been gifted a “baby kombucha” as my kids call the SCOBY (Symbiotic Culture of Bacteria and Yeast).
What is Kombucha?
From a previous article:
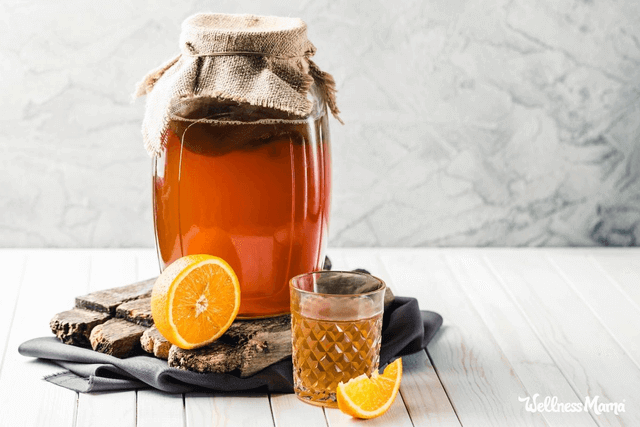
Kombucha is a fermented sweetened tea that has been around for centuries. It is slightly tangy and slightly sweet, and a great treat on a summer day. Just as with water kefir, kombucha can be double fermented into a fizzy soda with a slight fruit taste.
Kombucha contains high levels of antioxidants, b-vitamins, probiotics, and glucaric acid. It has been reported to have a variety of health benefits including:
- liver detoxification
- improved pancreas function
- increased energy
- better digestion
- improved mood (helps with anxiety/depression)
- kills candida (yeast)
- helps nutrient assimilation
Kombucha has gained popularity in recent years and there are some pre-made commercial versions available. While they taste great, homemade versions are a much more frugal alternative (and equally delicious in my opinion).
Continuous Brew Kombucha vs. Batch System

For years I had been brewing with the batch system for making kombucha and while I still really like that method, I’ve found that the continuous brew method is easier to fit into our schedule now. As the names suggest, the batch method is where kombucha is brewed in batches and re-started with each batch by using the SCOBY “baby” and some of the liquid from the previous batch.
The continuous brew kombucha method involves removing only some of the liquid each time and replacing with the same amount of fresh brewed sweetened tea. Leaving at least 30% of the brew after each decant is ideal, but you can drink a little at a time and add tea when the level gets low.
This yields a fresher brew (in my opinion), helps it brew faster (good when there are 6 people consuming it each day) and takes up less room on the counter. This article from the Weston A. Price foundation talks about the benefits of continuous brew.
From that article:
The benefits of continuous brewing are both practical and nutritional. They include:
- Less risk of mold and other contamination in kombucha batches, as once established, the liquid maintains a far more acidic environment, more hostile to outside invaders because of smaller amounts of free sugar and a greater population of good bacteria and yeast.
- Less overall work to produce more overall volume.
- More consistent supply of kombucha (a few bottles every day or every few days rather than having a large batch all at once).
- A broader array of bacteria and other beneficial compounds in the final product.
Continuous Brew System
The main difference in the methods is that continuous brew uses a larger container with a spigot so some of the brewed kombucha can be removed, leaving enough mature brew to start again. This means the container, spigot, and other materials must be of proper quality for kombucha production.
To choose a good vessel for your homebrew, consider:
- Size. The best size for most families is between 2 and 5 gallons. It is important to have a larger capacity since at least half of the liquid will remain in the vessel at all times.
- Material. Kombucha is a powerful detoxifier and is best brewed in inert, food-safe materials such as porcelain, stainless steel, stoneware, or glass. Oak barrels are also a great way to brew up a batch of tasty booch! They have been used in fermentation since, forever! (I got my brewing vessel here.)
- Spigot. A continuous brew vessel works best with a spigot so kombucha can be drawn off easily into your bottles. It is important that the spigot be made of a quality material such as BPA-free plastic, stainless steel, or wood. Some cheap beverage dispensers have spigots covered in metallic paint that will chip off and give the brew an off flavor. Also avoid any spigots that use glues, epoxies, or other adhesives to attach to the vessel as you will want to remove the spigot at cleaning time. Be sure to test the container and spigot thoroughly for leaks prior to filling it with the kombucha mixture. (These are the spigots I’ve used.)
- Cover. The cloth cover is vital to prevent contamination from fruit flies while also permitting oxygen to penetrate the brew. It is important the cloth be of a tightly woven yet breathable material such as cotton. Cheesecloth has a loose weave that will allow fruit flies or ants to invade the brew. Make sure it is snug fitting so they can’t sneak in another way. While you could use a paper towel or coffee filter, we prefer to not waste paper products and use these cute fermentation covers instead.
Where to Get Fermentation Vessels
I have several friends who use a two gallon mason-type jar with a spigot or any of the fermentation crocks here. Really any glass or ceramic jar with a spigot works as long as the spigot is safe. Or, you can take the guesswork out by getting a complete brew package from here.
How to Get a SCOBY
SCOBYs are living and thriving colonies of bacteria and unfortunately, you can’t just pick up a high quality one at your grocery store. There are a couple of ways to acquire a SCOBY.
- If you know anyone who already brews kombucha, ask them for an extra SCOBY and they will probably be glad to pass one on. The SCOBY has a “baby” every batch or two and this baby can then be used to brew kombucha. This is the best way if you are able to find one. Just make sure to ask them to include 1 cup of the brewed liquid to use as a strong starter liquid in making your own. You’ll need one SCOBY and 1 cup of starter liquid for each gallon you plan to brew.
- You can order a SCOBY (or two) from an online source. Just make sure the source is reputable. I’ve seen SCOBYs on sites like eBay or Amazon, but prefer a trusted site like Kombucha Kamp
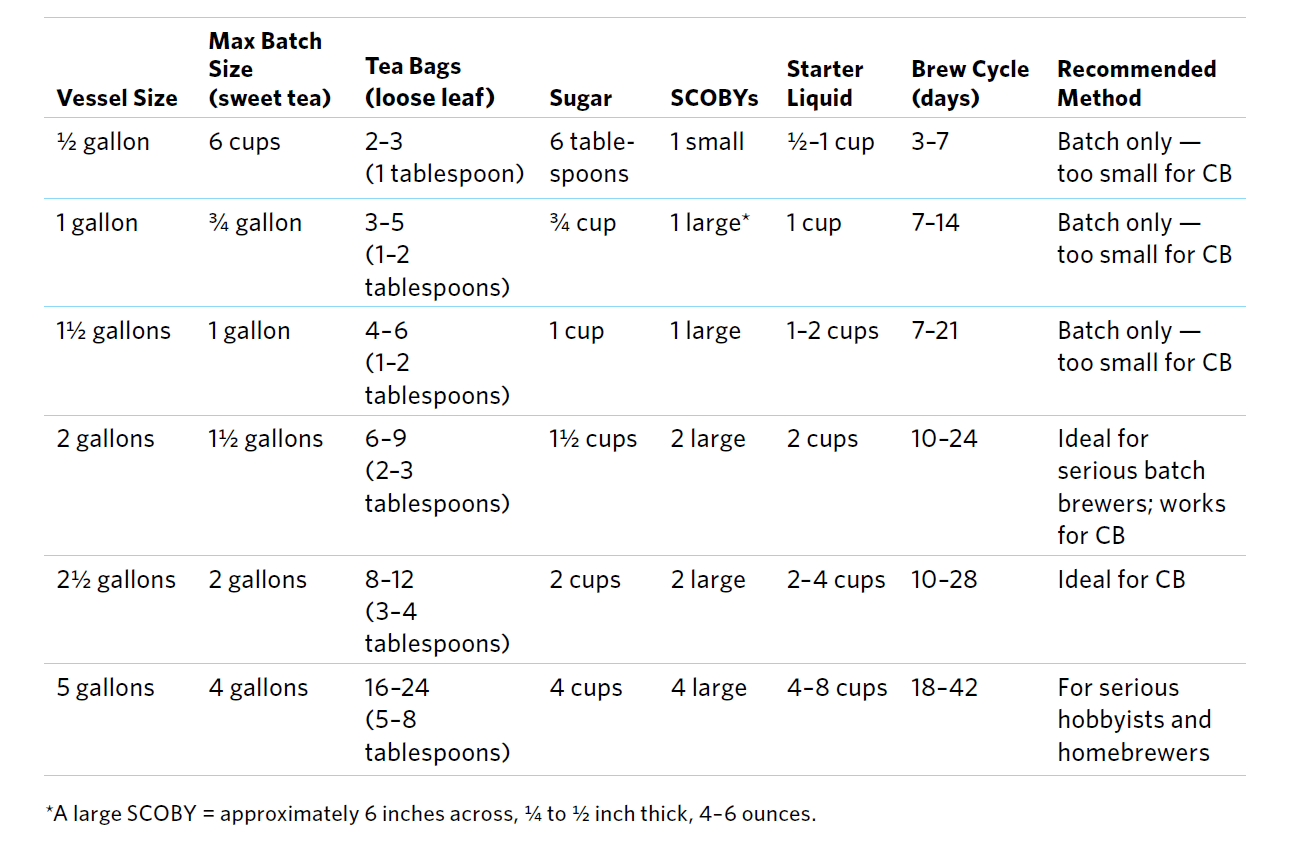
Once you have a SCOBY, the actual process of making kombucha is very easy! You’ll also want to make sure you have the correct amounts of tea and sugar for your container size.
Courtesy of The Big Book of Kombucha, here is a handy chart for batch and container size:
 How to Make Continuous Brew Kombucha
It’s easy to get started, and if you are a regular kombucha drinker, you’ll save so much money!
Equipment
There’s a few things you’ll need before making a continuous brew, including:
- Brewing vessel – you’ll need a 2-5 gallon brewing vessel and spigot of a safe material. Check this page out for lots of options
- A stirring utensil – for making the sweetened tea
- A fermentation cover – you can use a coffee filter and a rubber band, but I love these reusable breathable fermentation covers
The Recipe

Continuous Brew Kombucha Recipe
Servings
Ingredients
- tea this is my favorite blend for a delicious finished brew
- sugar
- starter tea from a previous batch of kombucha
- one kombucha SCOBY rehydrate first if you order a dehydrated one online
- filtered water preferably free of chlorine, chloramines, and fluoride
Instructions
- Prepare the sweet tea. I use 2 Tablespoons of loose tea, 2 family size tea bags, or 8-10 small bags per gallon of water. Add 1 cup of regular sugar per gallon. Do not use raw honey!
- Let tea cool to room temperature and make sure it really is cool! This step is very important as too hot of tea can kill your SCOBY.
- Once tea is completely cool, pour into glass jar, leaving about 20% of the room at the top.
- Pour in the correct amount of liquid from a previous batch of kombucha or if starting from a dehydrated SCOBY, pour in ½ cup from a store-bought bottle of kombucha. If you don’t have starter liquid, vinegar can be used instead.
- With very clean hands, add the SCOBY. The SCOBY may sink or float, it makes no difference, as the new SCOBY will eventually form on the top.
- Cover the jar with a fermentation cover or coffee filter and rubber band.
- Put the jar in a warm (around 75-85 degrees is best) corner of the kitchen where it is at least a few feet away from any other fermenting products. If your kitchen isn’t warm enough, it may help to use a heating mat on the side of the brewing vessel.
- Let sit to ferment for around 7-21 days, though the length of time may vary depending on your temperature and batch size. You can taste test the kombucha to see if it is done. It should taste tart but still very slightly sweet also.
- At this point, kombucha is ready for a second ferment to add carbonation. If you aren’t doing the second ferment, just pour the kombucha into another jar or jars with airtight lids and seal until ready to drink.
- For continuous brew, we dispense into several quart size mason jars with plastic storage caps (don’t use metal!), leaving about 20% of the room on top.
Nutrition
For more specifics, here is a helpful video from my friend Hannah (the Kombucha Mamma) and you can watch the full series of tutorial videos here:
Second Ferment (How to Make Soda!)
Kombucha can be consumed as soon as it is done brewing, but adding fruit juice or fruit can make kombucha carbonated and slightly sweeter, which is often more appealing to kids. It is an easy second step too!
- Dispense the kombucha into mason jars with plastic lids or these type of Grolsch beer bottles, leaving about 1/5 of the room at the top for add-ins.
- Add fruit juice to almost fill the jar, or fresh fruit of choice and then cap tightly to allow the mixture to carbonate.
- Leave at room temperature for 2-3 days to allow to carbonate, but check it carefully as pressure can build up and break the jars if left for too long.
- Store in refrigerator until ready to drink.
My favorite add-ins:
- minced ginger root and blueberries
- ½ organic lemon (quartered) and ½ tsp grated ginger (tastes like Sprite)
- minced ginger root and citrus
- ¼ cup fresh or frozen berries
- mango
- prunes and vanilla (Dr. Pepper/Cream soda type taste)
Special Notes for Continuous Brew
Continuous brew can be even easier than the batch method and is my method of choice. It just requires a few small tweaks for best flavor:
When to add sweet tea?
You can add it right away after decanting, or wait until you are ready for more kombucha. After adding the tea, wait at least 2 days and then begin tasting. The more mature the brew is, the faster it will turn that sweet tea into kombucha, so when you first start the continuous brew, it may take a little longer to be ready. The longer it ferments, the more tart the brew will be, so harvest when you like the flavor.
Flavor is the key!
The brew is ready when you like the flavor, that is the most important factor. If you don’t like the taste, you won’t drink it! Of course, the longer it brews, the less sugar is present, so those who are concerned with keeping sugar content low should ferment a few extra days until the flavor is more sour. Trust your taste buds to let you know.
Less cleaning…
One of the great things about continuous brew is not having to clean the vessel between each brew. However, every couple of months it will be time to clean out the vessel, remove excess yeast from the spigot, and even cut down the SCOBY so that it doesn’t take up too much room in the vessel.
To clean, remove the large SCOBY and remaining liquid to another vessel or bowl, then remove the spigot and rinse all elements clean. If soap is used, rinse again very well to prevent any residue from causing issues with the brew. Then trim down the SCOBY as needed (you can use a knife or scissors as brief contact won’t be a problem) and re-start just as before.
FAQs and more info
If you would like more detailed instructions, I highly recommend The Big Book of Kombucha as the ideal resource for all your kombucha questions. Or you could choose to get an online kit that includes the book, videos, and complete instructions, as well as the supplies. They have taken out all the guesswork!
For even more on the science and lore of kombucha, check out my podcasts with Hannah Krum:
- 269: Kombucha Questions Answered: Alcohol, Candida, Pregnancy, and More With Kombucha Kamp
- 36: Getting Started With Homemade Kombucha
Do you make kombucha? Ever tried this method? Share below!


Leave a Reply