Kombucha is a fermented sweetened tea that has been around for centuries. It has a tangy and sweet flavor and can be double-fermented with fruit or juice to make a fizzy drink similar to soft drinks.
This ancient beverage has surged in popularity in recent years and is now available in many grocery stores and health food stores. Store-bought kombucha often costs $3-5 a bottle, so making it at home is a great way to save a lot of money.
If you’re a fan of this probiotic and enzyme-rich drink, try brewing it at home for just pennies a cup!
Health Benefits of Kombucha
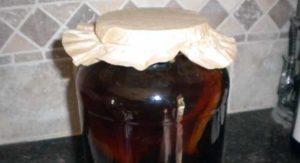
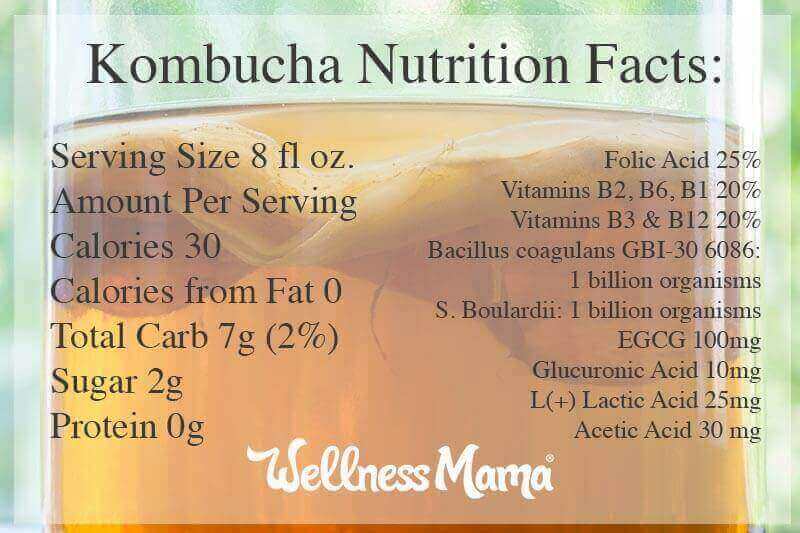
Kombucha fans attribute a wide variety of benefits to kombucha and claim that it helps with everything from joint pain to cancer. These claims are largely unproven, as there are very few studies about kombucha, but we do know that it contains a variety of vitamins and beneficial acids.
In fact, it is considered a good source of antioxidants, B-vitamins, probiotics, and glucaric acid.
Downsides of Kombucha
Of course, like everything, there is a flip side! Here are some concerns when it comes to kombucha. They’re nothing alarming but good to be aware of especially when choosing a commercial brand.
Too Much Sugar?
Kombucha is brewed from sweetened tea and the recipe contains a cup of sugar per gallon of tea. Understandably, some people worry about the sugar content.
Not to worry…
During the fermentation process, the beneficial colony of bacteria consumes most of the sugar, so it has minimal effect on blood sugar. The sugar is simply the food for these beneficial bacteria and the beneficial acids, enzymes, and probiotics are a result of the fermentation.
Caffeine and Alcohol?
If caffeine is a concern, kombucha can be made with caffeinated or decaf tea, and even with green tea or herbal teas. To protect the culture, it is good to use at least 20% regular black tea though.
Kombucha can contain very small amounts of alcohol, typically around 0.5% or less, which is similar to an over-ripe banana. Some store-bought brands contain more alcohol and are typically sold in a different section of the store and require ID for purchase.
Why Make Raw Kombucha at Home?
As I mentioned, it is significantly less expensive to make kombucha at home. Some store brands are also pasteurized, killing many of the probiotics and enzymes present in raw kombucha.
Here are some of the reasons you may want to consider making kombucha at home:
Great Soda Alternative
While the health claims about kombucha have not been confirmed by western medical research, there is no denying that it is a healthier and lower sugar drink than soda. It has natural carbonation and provides some B-vitamins and beneficial enzymes that aren’t present in soda as well.
Easy to Customize
My favorite part about making kombucha at home is how easy it is to customize and make different flavors. Add grape juice or apple juice for a slightly flavored version. Add some fresh or frozen strawberries for a super carbonated tangy taste. Or even add some raisins and a vanilla bean for a taste similar to a leading soda that starts with Dr. and ends with Pepper!
Save Money
Store-bought kombucha is expensive. Homemade is not. You can make an entire gallon at home for less than the cost of a single bottle in stores. Since you control the brew time and flavors, you’ll probably get a more flavorful and more nutrient-dense brew at home too!
Important Caution
The one potential problem with making kombucha at home is the possibility of a harmful bacteria or mold growing in the fermentation vessel. To avoid these problems, it is important to follow the correct procedures for brewing and to carefully sanitize all equipment before use. Also, starting with a high-quality culture (see the recipe for my recommendation) and plenty of strong starter liquid helps.
That said, I’ve personally made kombucha for over five years and have never had any problems with it!
How to Get a SCOBY

The kombucha is brewed with a SCOBY (Symbiotic Culture of Yeast and Bacteria) that “eats” the sugars in the sweetened tea and creates an acidic, vitamin and probiotic-rich beverage.
SCOBYs are living and thriving colonies of bacteria and unfortunately, you can’t just pick one up a high quality one at your grocery store. There are several ways to acquire a SCOBY.
- If you know anyone who already brews kombucha, ask them for an extra SCOBY and they will probably be glad to pass one on. The SCOBY has a “baby” every batch or two and this baby can then be used to brew more kombucha. Just make sure that they include at least one cup of strong starter liquid with each SCOBY. If you plan to continuous brew, you’ll want one cup for each gallon of liquid you will brew.
- You can order a SCOBY from an online source. Just make sure the source is reputable. Avoid dehydrated SCOBYs that require a long rehydration period and produce a weaker brew. I’ve seen SCOBYs on sites like eBay or Amazon, but prefer a trusted site like my friends and affiliate partners Hannah and Alex from Kombucha Kamp.
- Grow your own. This may or may not be successful and can be done using a pre-made bottle of kombucha that you can get from a health food store. (This takes several weeks and may not work, so I don’t personally recommend this option)
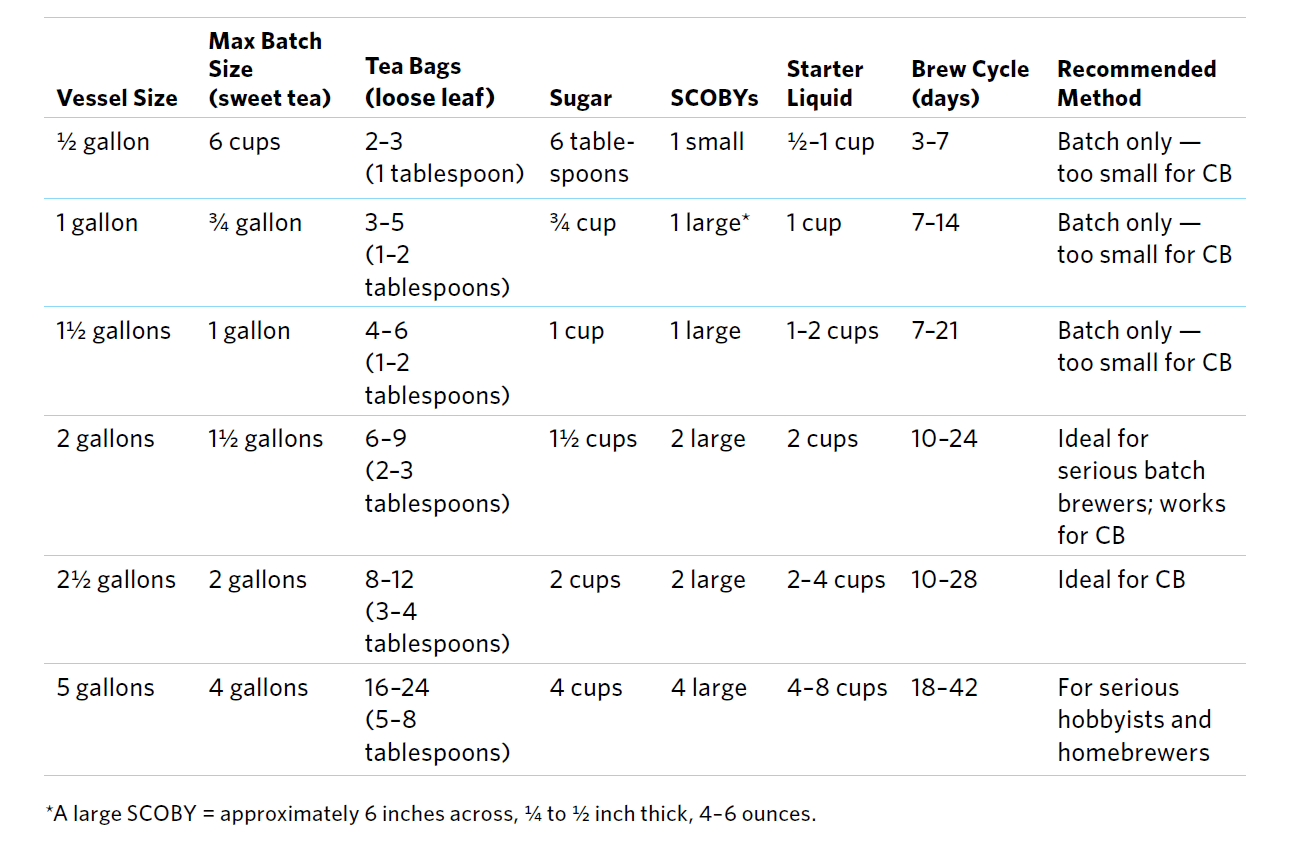
Courtesy of The Big Book of Kombucha, here is a handy chart for batch and container size:
How to Make Raw Kombucha: Batch Method
Once you have a SCOBY, the actual process of making kombucha is very easy!
Notes: Make sure all ingredients, materials, and your hands are clean. If you already ferment other things (kefir, sauerkraut, pickles, beer, etc.) in your kitchen, make sure all the jars are at least a few feet apart to prevent cross-contamination of the cultures.
Equipment & Ingredients Needed
- A gallon size glass jar (or other suitable brew vessel) – One gallon is the standard size but you can brew smaller or larger. Make sure it’s really clean! I like to rinse with white vinegar to make sure.
- Brewed sweetened tea (ratio: 1 cup of sugar per gallon of tea) – I love this tea blend that is specifically created for brewing kombucha, but regular black tea works too.
- A SCOBY – and 1 cup of liquid from a previous batch of kombucha for each gallon of sweetened tea
- Fermentation cover– like the ones here or a coffee filter or thin cloth and a rubber band
If you’ve mastered the regular batch method, you may also consider the continuous brew method, which can brew larger amounts much more quickly.
How to Make Continuous Brew Kombucha
For years I had been brewing with the batch system for making kombucha at home, and while I still really like that method, I’ve found that the continuous brew method is an easier alternative that removes a step. As the names suggest, the batch method is where kombucha is brewed in batches and re-started with each batch by using the SCOBY “baby” and some of the liquid from the previous batch.
The continuous brew kombucha method involves removing only some of the liquid each time and replacing with the same amount of fresh brewed sweetened tea. This yields a fresher brew (in my opinion), helps it brew faster (good when there are 6 people consuming it each day) and takes up less room on the counter. This article from the Weston A. Price foundation talks about the benefits of continuous brew:
Continuous Brew Benefits include:
- There is less risk of mold and other contamination since once it is established, the liquid maintains a far more acidic environment. This means it is more hostile to outside invaders because of smaller amounts of free sugar and a greater population of good bacteria and yeast.
- Less overall work to produce more overall volume as some can be removed and more tea added without reducing the pH as much. It can also brew much more quickly depending on the kombucha/new tea ratio.
- More consistent supply of kombucha (a few bottles every day or every few days rather than having a large batch all at once).
- A broader array of bacteria and other beneficial compounds in the final product.
How to Setup a Continuous Brew System
The main difference in the methods is that continuous brew uses a container with a spigot so some of the brewed kombucha can be removed without disturbing the rest of the brew. The most important thing you will need for this method is a continuous brew vessel.
Look for a vessel that can hold 1-5 gallons. It should be made of a safe material like glass, stoneware, porcelain, or wood.
It will also need to have a spigot near the bottom so that kombucha can be removed without disturbing the SCOBY or the rest of the brew. Make sure to test the spigot for leaks before using.
A continuous brew vessel should also have a breathable cover so air can escape. It should cover the entire top of the vessel and be sealed tightly so that insects can’t get in. Some vessels come with a cover, but a clean towel or coffee filter and a rubber band work well too.
There are a variety of high quality continuous brew vessels available here.
Continuous Brew Kombucha Instructions
Follow these easy printable instructions for continuous brew:
Continuous Brew Kombucha Recipe
Servings
Ingredients
- tea (this is my favorite blend for a delicious brew)
- sugar
- one kombucha SCOBY per gallon of sweet tea
- starter tea from a previous batch of kombucha
- filtered water ( preferably free of chlorine, chloramines, and fluoride)
Instructions
- Prepare the sweet tea. I use 2 tablespoons of loose tea, 2 family size tea bags, or 8-10 small bags per gallon of water. Add 1 cup of regular sugar per gallon. Do not use raw honey!
- Let tea cool to room temperature and make sure that it is really cool! This step is very important as too hot of tea can kill your SCOBY.
- Once the tea is completely cool, add the SCOBY and the correct amount of starter liquid.
- Cover the jar with the coffee filter or cloth and rubber band tightly (flies love this stuff!).
- Put the jar in a warm corner of the kitchen where it is at least a few feet away from any other fermenting products. Around 75-85°F is best. If your kitchen is cold, you may need a heating mat.
- Let sit to ferment for around 7-21 days, though the length of time may vary depending on your temperature and batch size. You can taste test the kombucha to see if it is done. It should taste tart, but still very slightly sweet also.
- At this point, kombucha is ready for a second ferment. If you aren’t doing the second ferment, just pour the kombucha into another jar or jars with airtight lids and seal until ready to drink.
- For continuous brew, we dispense in to several quart size mason jars with plastic storage caps (don't use metal!), leaving about 20% of the room on top.
If you want a fizzy and flavored final product like the kind in stores, you’ll also want to do a second ferment:
How to Do a Second Ferment (How to Make Soda!)
Just as with water kefir, using fruit juice can make kombucha carbonated and slightly sweeter, which is often more appealing to kids. It is an easy second step too!
 Get another very clean gallon sized jar or 5 quart sized glass jars (I prefer this).
- Pour 1 quart of juice of your choice into the big jar or divide between smaller jars, filling each jar about 1/5 full.
- Pour the finished kombucha into the smaller jars until about 1 inch from the top. Make sure to leave about ½ cup brewed kombucha in the jar with the SCOBY.
- Once the kombucha is poured off, pour the SCOBY and remaining juice into a clean bowl.
- Repeat the steps above for the first fermentation to start another batch.
- Tightly cap the smaller jars with the fruit juice added and leave at room temperature for another 2-7 days until carbonated to your taste.
- Refrigerate before drinking or pour over ice.
- Enjoy!
My Favorite Flavor Add-ins:
- minced ginger root and blueberries
- ½ organic lemon (quartered) and ½ tsp grated ginger (tastes like Sprite)
- minced ginger root and citrus
- ¼ cup fresh or frozen berries
- mango
- prunes and vanilla (Dr. Pepper/cream soda type taste)

Ever brewed kombucha or other fermented drink? What’s your favorite? Share below!



Leave a Reply