,

How to Make Kombucha Tea: Recipe and Tutorial

Katie Wells Avatar

Reading Time: 9 minutes

This post contains affiliate links.

Read my affiliate policy.

How to make Kombucha- recipe and tutorial
Wellness Mama » Blog » Recipes » How to Make Kombucha Tea: Recipe and Tutorial

Kombucha is a fermented sweetened tea that has been around for centuries. It has a tangy and sweet flavor and can be double-fermented with fruit or juice to make a fizzy drink similar to soft drinks.

This ancient beverage has surged in popularity in recent years and is now available in many grocery stores and health food stores. Store-bought kombucha often costs $3-5 a bottle, so making it at home is a great way to save a lot of money.

If you’re a fan of this probiotic and enzyme-rich drink, try brewing it at home for just pennies a cup!

Health Benefits of Kombucha

how to make kombucha easy recipe

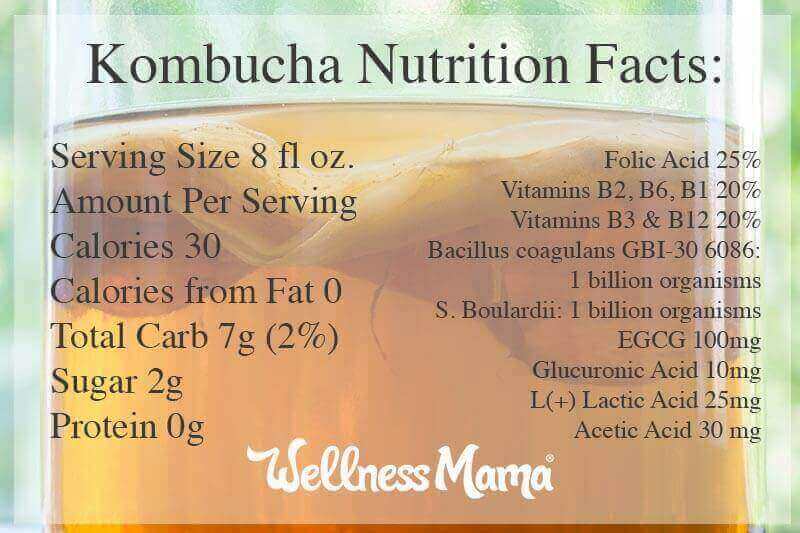
Kombucha fans attribute a wide variety of benefits to kombucha and claim that it helps with everything from joint pain to cancer. These claims are largely unproven, as there are very few studies about kombucha, but we do know that it contains a variety of vitamins and beneficial acids.

In fact, it is considered a good source of antioxidants, B-vitamins, probiotics, and glucaric acid.

Kombucha Nutrition Facts

Downsides of Kombucha

Of course, like everything, there is a flip side! Here are some concerns when it comes to kombucha. They’re nothing alarming but good to be aware of especially when choosing a commercial brand.

Too Much Sugar?

Kombucha is brewed from sweetened tea and the recipe contains a cup of sugar per gallon of tea. Understandably, some people worry about the sugar content.

Not to worry…

During the fermentation process, the beneficial colony of bacteria consumes most of the sugar, so it has minimal effect on blood sugar. The sugar is simply the food for these beneficial bacteria and the beneficial acids, enzymes, and probiotics are a result of the fermentation.

Caffeine and Alcohol?

If caffeine is a concern, kombucha can be made with caffeinated or decaf tea, and even with green tea or herbal teas. To protect the culture, it is good to use at least 20% regular black tea though.

Kombucha can contain very small amounts of alcohol, typically around 0.5% or less, which is similar to an over-ripe banana. Some store-bought brands contain more alcohol and are typically sold in a different section of the store and require ID for purchase.

Why Make Raw Kombucha at Home?

As I mentioned, it is significantly less expensive to make kombucha at home. Some store brands are also pasteurized, killing many of the probiotics and enzymes present in raw kombucha.

Here are some of the reasons you may want to consider making kombucha at home:

Great Soda Alternative

While the health claims about kombucha have not been confirmed by western medical research, there is no denying that it is a healthier and lower sugar drink than soda. It has natural carbonation and provides some B-vitamins and beneficial enzymes that aren’t present in soda as well.

Easy to Customize

My favorite part about making kombucha at home is how easy it is to customize and make different flavors. Add grape juice or apple juice for a slightly flavored version. Add some fresh or frozen strawberries for a super carbonated tangy taste. Or even add some raisins and a vanilla bean for a taste similar to a leading soda that starts with Dr. and ends with Pepper!

Save Money

Store-bought kombucha is expensive. Homemade is not. You can make an entire gallon at home for less than the cost of a single bottle in stores. Since you control the brew time and flavors, you’ll probably get a more flavorful and more nutrient-dense brew at home too!

Important Caution

The one potential problem with making kombucha at home is the possibility of a harmful bacteria or mold growing in the fermentation vessel. To avoid these problems, it is important to follow the correct procedures for brewing and to carefully sanitize all equipment before use. Also, starting with a high-quality culture (see the recipe for my recommendation) and plenty of strong starter liquid helps.

That said, I’ve personally made kombucha for over five years and have never had any problems with it!
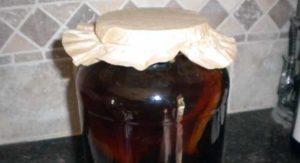
How to Get a SCOBY

What is a SCOBY- symbiotic colony of bacteria and yeast

The kombucha is brewed with a SCOBY (Symbiotic Culture of Yeast and Bacteria) that “eats” the sugars in the sweetened tea and creates an acidic, vitamin and probiotic-rich beverage.

SCOBYs are living and thriving colonies of bacteria and unfortunately, you can’t just pick one up a high quality one at your grocery store. There are several ways to acquire a SCOBY.

  • If you know anyone who already brews kombucha, ask them for an extra SCOBY and they will probably be glad to pass one on. The SCOBY has a “baby” every batch or two and this baby can then be used to brew more kombucha. Just make sure that they include at least one cup of strong starter liquid with each SCOBY. If you plan to continuous brew, you’ll want one cup for each gallon of liquid you will brew.
  • You can order a SCOBY from an online source. Just make sure the source is reputable. Avoid dehydrated SCOBYs that require a long rehydration period and produce a weaker brew. I’ve seen SCOBYs on sites like eBay or Amazon, but prefer a trusted site like my friends and affiliate partners Hannah and Alex from Kombucha Kamp.
  • Grow your own. This may or may not be successful and can be done using a pre-made bottle of kombucha that you can get from a health food store. (This takes several weeks and may not work, so I don’t personally recommend this option)

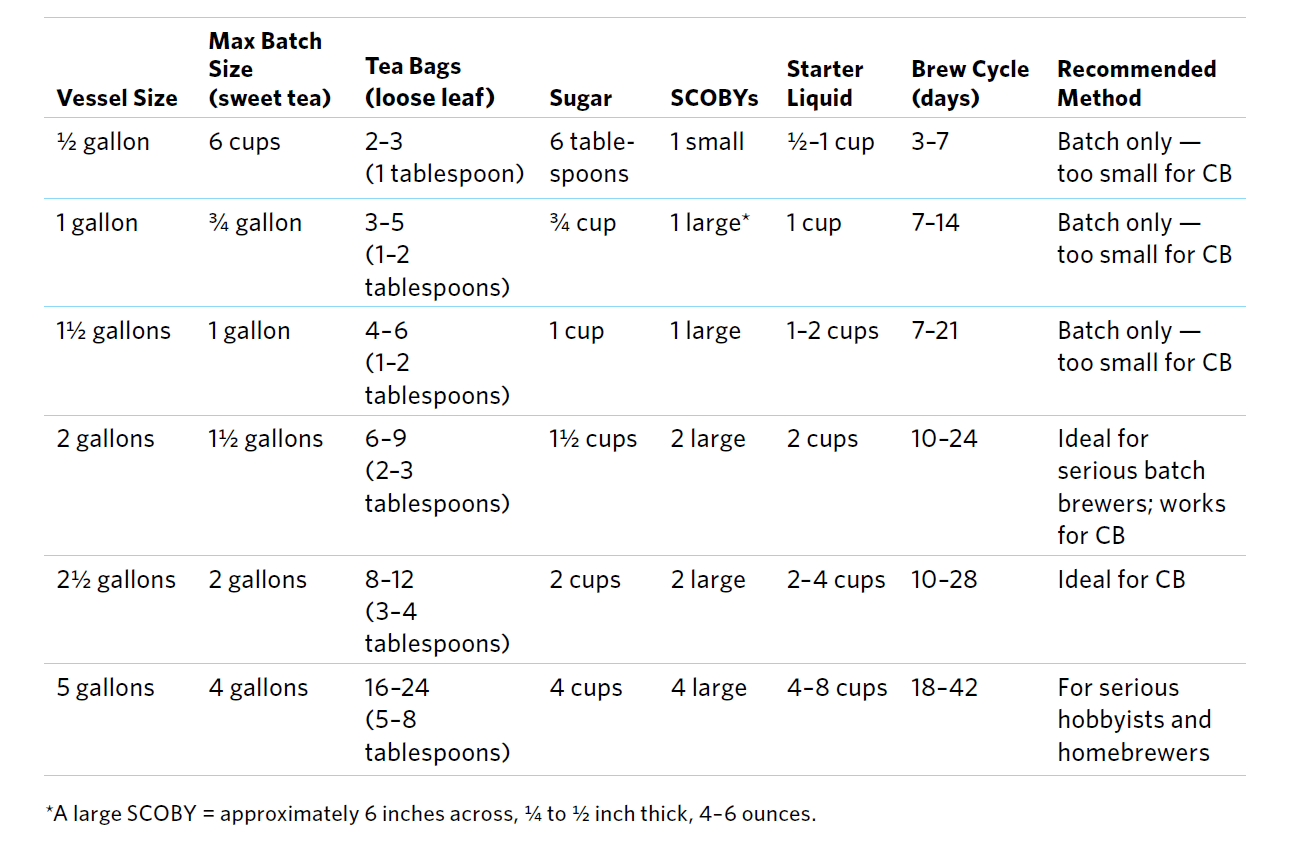
Courtesy of The Big Book of Kombucha, here is a handy chart for batch and container size:

Batch and Continuous Brew size chart courtesy The Big Book of Kombucha

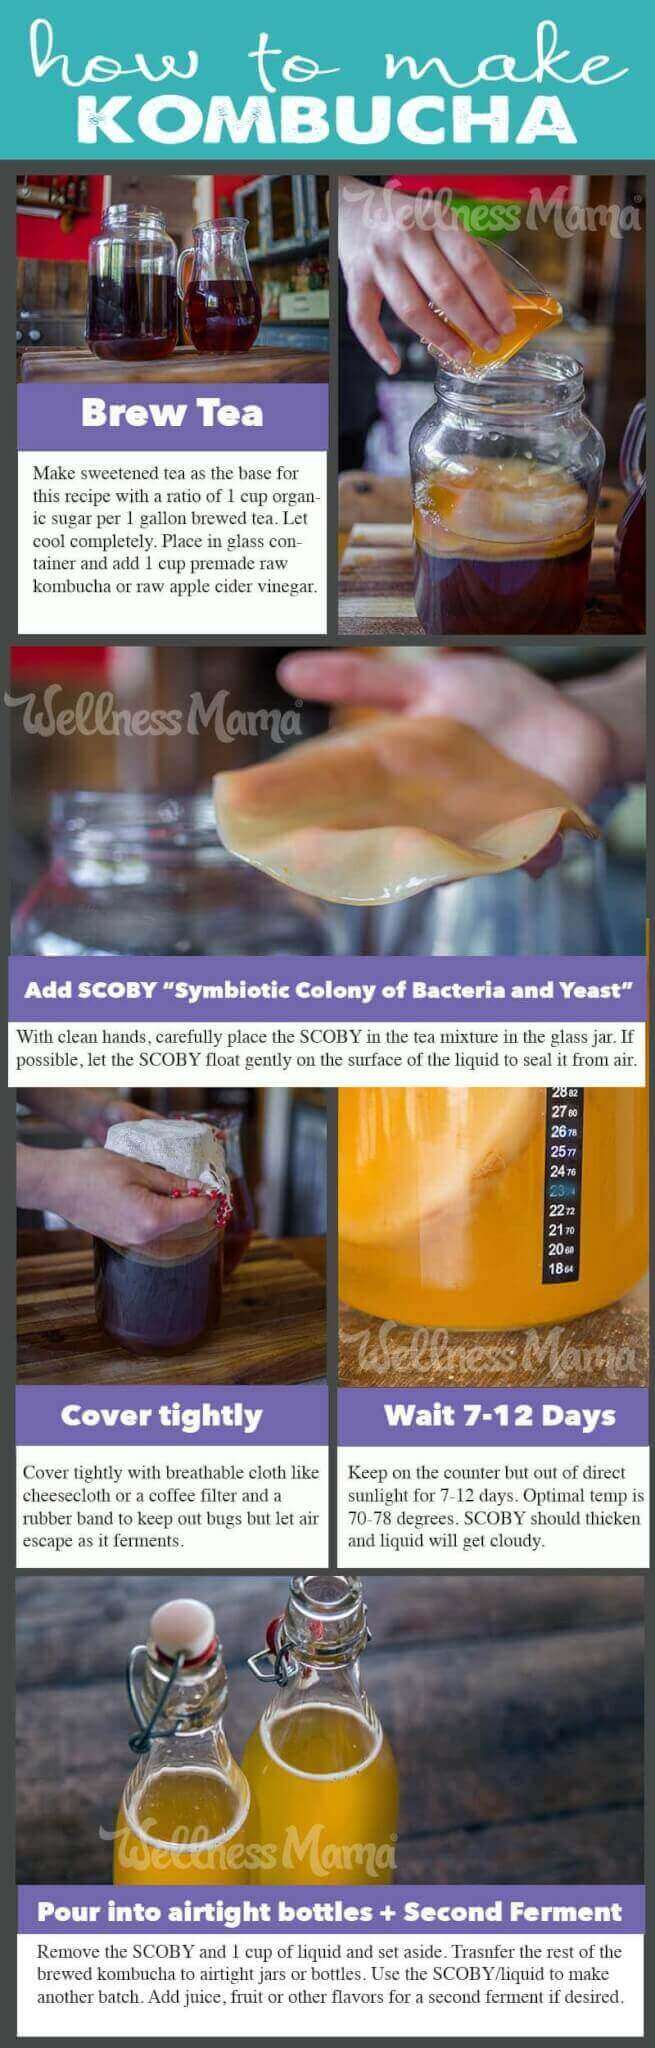
How to Make Raw Kombucha: Batch Method

Once you have a SCOBY, the actual process of making kombucha is very easy!

Notes: Make sure all ingredients, materials, and your hands are clean. If you already ferment other things (kefir, sauerkraut, pickles, beer, etc.) in your kitchen, make sure all the jars are at least a few feet apart to prevent cross-contamination of the cultures.

Equipment & Ingredients Needed

  • A gallon size glass jar (or other suitable brew vessel) – One gallon is the standard size but you can brew smaller or larger. Make sure it’s really clean! I like to rinse with white vinegar to make sure.
  • Brewed sweetened tea (ratio: 1 cup of sugar per gallon of tea) – I love this tea blend that is specifically created for brewing kombucha, but regular black tea works too.
  • A SCOBY – and 1 cup of liquid from a previous batch of kombucha for each gallon of sweetened tea
  • Fermentation coverlike the ones here or a coffee filter or thin cloth and a rubber band

If you’ve mastered the regular batch method, you may also consider the continuous brew method, which can brew larger amounts much more quickly.

How to Make Continuous Brew Kombucha

For years I had been brewing with the batch system for making kombucha at home, and while I still really like that method, I’ve found that the continuous brew method is an easier alternative that removes a step. As the names suggest, the batch method is where kombucha is brewed in batches and re-started with each batch by using the SCOBY “baby” and some of the liquid from the previous batch.

The continuous brew kombucha method involves removing only some of the liquid each time and replacing with the same amount of fresh brewed sweetened tea. This yields a fresher brew (in my opinion), helps it brew faster (good when there are 6 people consuming it each day) and takes up less room on the counter. This article from the Weston A. Price foundation talks about the benefits of continuous brew:

Continuous Brew Benefits include:

  • There is less risk of mold and other contamination since once it is established, the liquid maintains a far more acidic environment. This means it is more hostile to outside invaders because of smaller amounts of free sugar and a greater population of good bacteria and yeast.
  • Less overall work to produce more overall volume as some can be removed and more tea added without reducing the pH as much. It can also brew much more quickly depending on the kombucha/new tea ratio.
  • More consistent supply of kombucha (a few bottles every day or every few days rather than having a large batch all at once).
  • A broader array of bacteria and other beneficial compounds in the final product.

How to Setup a Continuous Brew System

The main difference in the methods is that continuous brew uses a container with a spigot so some of the brewed kombucha can be removed without disturbing the rest of the brew. The most important thing you will need for this method is a continuous brew vessel.

Look for a vessel that can hold 1-5 gallons. It should be made of a safe material like glass, stoneware, porcelain, or wood.

It will also need to have a spigot near the bottom so that kombucha can be removed without disturbing the SCOBY or the rest of the brew. Make sure to test the spigot for leaks before using.

A continuous brew vessel should also have a breathable cover so air can escape. It should cover the entire top of the vessel and be sealed tightly so that insects can’t get in. Some vessels come with a cover, but a clean towel or coffee filter and a rubber band work well too.

There are a variety of high quality continuous brew vessels available here.

Continuous Brew Kombucha Instructions

Follow these easy printable instructions for continuous brew:

carbonated kombucha how to make kombucha soda

Continuous Brew Kombucha Recipe

A great way to brew kombucha so you have a continuous supply without the need to constantly re-make and clean containers.
Prep Time 10 minutes
Total Time 10 minutes
Author Katie Wells

Servings

Ingredients

Instructions

  • Prepare the sweet tea. I use 2 tablespoons of loose tea, 2 family size tea bags, or 8-10 small bags per gallon of water. Add 1 cup of regular sugar per gallon. Do not use raw honey!
  • Let tea cool to room temperature and make sure that it is really cool! This step is very important as too hot of tea can kill your SCOBY.
  • Once the tea is completely cool, add the SCOBY and the correct amount of starter liquid.
  • Cover the jar with the coffee filter or cloth and rubber band tightly (flies love this stuff!).
  • Put the jar in a warm corner of the kitchen where it is at least a few feet away from any other fermenting products. Around 75-85°F is best. If your kitchen is cold, you may need a heating mat.
  • Let sit to ferment for around 7-21 days, though the length of time may vary depending on your temperature and batch size. You can taste test the kombucha to see if it is done. It should taste tart, but still very slightly sweet also.
  • At this point, kombucha is ready for a second ferment. If you aren’t doing the second ferment, just pour the kombucha into another jar or jars with airtight lids and seal until ready to drink.
  • For continuous brew, we dispense in to several quart size mason jars with plastic storage caps (don't use metal!), leaving about 20% of the room on top.

Like this recipe? Check out my new cookbook, or get all my recipes (over 500!) in a personalized weekly meal planner here!

If you want a fizzy and flavored final product like the kind in stores, you’ll also want to do a second ferment:

How to Do a Second Ferment (How to Make Soda!)

Just as with water kefir, using fruit juice can make kombucha carbonated and slightly sweeter, which is often more appealing to kids. It is an easy second step too!

  1. kombucha soda drink recipeGet another very clean gallon sized jar or 5 quart sized glass jars (I prefer this).
  2. Pour 1 quart of juice of your choice into the big jar or divide between smaller jars, filling each jar about 1/5 full.
  3. Pour the finished kombucha into the smaller jars until about 1 inch from the top. Make sure to leave about ½ cup brewed kombucha in the jar with the SCOBY.
  4. Once the kombucha is poured off, pour the SCOBY and remaining juice into a clean bowl.
  5. Repeat the steps above for the first fermentation to start another batch.
  6. Tightly cap the smaller jars with the fruit juice added and leave at room temperature for another 2-7 days until carbonated to your taste.
  7. Refrigerate before drinking or pour over ice.
  8. Enjoy!

My Favorite Flavor Add-ins:

  • minced ginger root and blueberries
  • ½ organic lemon (quartered) and ½ tsp grated ginger (tastes like Sprite)
  • minced ginger root and citrus
  • ¼ cup fresh or frozen berries
  • mango
  • prunes and vanilla (Dr. Pepper/cream soda type taste)
How to Make Kombucha - Picture Tutorial

Ever brewed kombucha or other fermented drink? What’s your favorite? Share below!

Katie Wells Avatar

About Katie Wells

Katie Wells, CTNC, MCHC, Founder of Wellness Mama and Co-founder of Wellnesse, has a background in research, journalism, and nutrition. As a mom of six, she turned to research and took health into her own hands to find answers to her health problems. WellnessMama.com is the culmination of her thousands of hours of research and all posts are medically reviewed and verified by the Wellness Mama research team. Katie is also the author of the bestselling books The Wellness Mama Cookbook and The Wellness Mama 5-Step Lifestyle Detox.

Comments

411 responses to “How to Make Kombucha Tea: Recipe and Tutorial”

  1. Mary Avatar

    I have some questions about the second fermentation process. First of all, what’s with Step 4 in the instructions, pouring the SCOBY and juice into a bowl? What do you do with it after that? And — perhaps related — do you put the SCOBY back in for the second ferment, or leave it out? Thanks!

      1. Katie Avatar

        For the second fermentation, I have added frozen pineapple to the jar and makes a wonderful kombucha. For each 2 quart jar, half a can of frozen pineapple is added. Coconut flavoring is added when serving.

  2. Andrea F. Avatar
    Andrea F.

    I have made kombucha before, but I am curious about something. Do you steep the tea for the amount of time called for according to the directions on the tea box, or do you steep the tea for the entire time the water cools from boiling to room temperature? Just curious, especially if this might make a difference in flavor/quality of my kombucha.

  3. DJ Avatar

    When you do the second brew, is it ok to use the metal lids that come with mason jars?

  4. Ashley Avatar

    Oh and I have a question for Wellness Mama or for anyone who has experience with using loose leaf tea? I have been using Tetley tea and my kombucha ferments really fast but I wanted to use organic tea. So I ordered the oolong loose leaf tea from Mountain Rose Herbs. My scoby is growing very slowly, and the tea is fermenting very slowly, it’s flat tasting and very sugary, it’s just not bubbling up like it usually does with the regular Tetley tea. Does anyone know why? Has anyone used loose leaf? I read the package from MRH and it says their oolong tea has been partially fermented. Could that be why it’s not making a good batch of kombucha? I really thought using the loose leaf organic tea would be far more healthier than the regular Tetley….

    1. fiona Avatar

      Apparently Tetley – loose or in bags is grown using pesticides.

  5. Sheila Avatar

    Started my 1st Kombucha batch on New Years Day. I’m not sure about doing a 2nd ferment and am confused by these directions? Step 4 says to take the SCOBY and remaining juice? So you make the 2nd batch of kombucha with juice? I’m on a low carb diet. Does the finished ‘soda’ have a lot of carbs?

    1. Ashley Avatar

      Flowering Soul, do you mean the second ferment or making another batch once your first batch is finished? The second ferment is simply flavoring your kombucha with juice. You don’t have to do that if you don’t want to but it does taste nice:) if you were asking about making another batch, you make each new batch with your scoby and a cup of kombucha leftover from your last batch as a starter ( you wouldn’t want to add juice in with your scoby) so for each new batch your ingredients are: scoby, kombucha starter and your sweetened tea:) I hope that helps?:)

      1. Ashley Avatar

        Oh and as for carbs. I wouldn’t think so? But I don’t know….. The scoby eats most of the sugar and I have heard of people using kombucha tea in their weight loss diet….

  6. Caitlyn Baldo Avatar
    Caitlyn Baldo

    I want to make this in my glass lemonade/ice tea jug that has a spigot on the botton, but the spigot is plastic… Can I use this jug???

    1. Kitty Avatar

      I have always used exactly the same thing, and I never eve thought about the plastic piece! It’s never seemed to bother mine 🙂

  7. Carrie Poulson Avatar
    Carrie Poulson

    So I think my second ferment produced new SCOBY’s when it was only 2 days old….is that normal, or do you think I am growing something else?

  8. Vesela Georgiev Avatar
    Vesela Georgiev

    Hello, I will be very grateful for advice: I just opened my first batch of kombucha and found a tea bag that I had missed and had obviously stayed there for 10 days. Do you think I should throw away the SCOBY and the kombucha? I threw away the original SCOBY because the tea bag was logged into it but kept the new SCOBY and the kombucha tea. Please, anybody who has any feedback, I will appreciate it – I am new at this and still trying to figure out what is acceptable and what not. Thank you and Happy Holidays!

  9. Ana Avatar

    If you use herbal tea or flavored teas, you will not have a successful batch. People sensitive to caffeine (like me) can drink kombucha because the brewing process gets rid of most of the caffeine. Plain black tea is the best, or a blend of half green and half black. You can use herbal teas, as long as you use at least 50% black tea. The caffeine content in brewed kombucha is negligible. Using flavored teas, like ginger, can kill your Scoby.

    1. Skylar D Avatar
      Skylar D

      4 stars
      So I brewed my first batch of kombucha
      ( bought a good sized scoby from farmers market)… I had a natural ginger concentrate to make tea with so I mixed that with darjeling tea… Did I ruin my scoby or is it possible that it can pull through my scoby parenting ignorance?

      Thanks for helping

  10. mischele Avatar

    I am trying my first batch im worried about the temperature I don’t keep my house that warm I have put my batch on a plate on a warmer burner on low but im worried that it will keep it to warm so I turn it off during the day im not sure what to do what happens if its to cold or to warm and which is better

    1. Ana Avatar

      Using a warmer, hot plate, or crock pot is not recommended because the glass jar gets too hot, which will kill the culture and Scoby. You want an undisturbed place that is warm and out of direct sunlight.

      Some people who like a cold house go so far as to do a weird setup with a warm-water aquarium to immerse the jars in 74-degree water for warmth without danger of overheating. 74 degrees is the perfect temperature for kombucha to brew. My house is at 68 degrees, but with the lights on in the kitchen, my brew spot on top of the cabinets gets up to 74.

      If your house gets too cold, you may only be able to brew in the summer months. I put mine on top of the cabinets in the kitchen (on top of the refrigerator jarred the kombucha and prevented the Scoby from forming), which is the warmest place in my house and also out-of-the-way. If you can keep that area between 68-74 degrees F (I bought a thermometer to sit next to my brewing vessel), your kombucha should do fine. I just turned my thermostat to 68 when I’m home (it goes down to 50 when I sleep or am gone, to save energy) and the kombucha still brews.

      1. Paulaine Avatar

        I set my brewing jar on top of a aquarium rock heater. Like you use for reptiles to sun & warm on in a terrarium.. Keep it plugged in and it works just fine. Never gets too hot. Just keeps things warm.

        1. Fran Avatar

          I have recently made my first batch of kombucha and we are enjoying it greatly. I was having a problem with temperature, the scoby just looked sad and only partially floating. I decided to put the jars on a warming plate that we use when making wine to keep the carboys warm. The 2 scobys are not only floating but making babies. The original ones I received were really big, can I cut these and give away pieces or will it damage the Mother.

          1. Ophelia Goring Avatar
            Ophelia Goring

            I wish I could have some of your scoby Fran, but I’m here in Richmond BC, Canada. Been searching for a store that I could pick up a scoby. If anyone knows please tell me. I would love to make my own kombucha. Thanks.

            Ophelia

      2. Nancy Ball Avatar
        Nancy Ball

        My husband, a chemist, reminded me that the fermentation process produces heat, so it should normally be warmer than your room temperature. The first time I brewed it, I checked it the next day and then relaxed. I also have in the cupboard next to my fridge. (My cupboard next to the stove is even warmer, but my jar didn’t fit there).

        1. Fiona Avatar

          I honestly don’t think there is any heat produced by the fermentation. I have been making Kombucha for years and the temperature has never changed. I don’t think a cupboard is a great idea as air circulation seems to be important but really; whatever works for you.

          Room temperature is fine.

          1. Bela Avatar

            Fermentation is an exothermic reaction (meaning that is produces heat). This occurs when sucralose (table sugar), breaks down to glucose and further to pyruvic acid (glycolysis). That chemical reaction produces heat.

  11. Tiffany Avatar

    I just brewed my first batch. Your instructions were so concise and easy to follow. The best, over all others I read. Thank you for taking the intimidation factor out of the process, which had prevented me from trying this before. Between your great recipe, and my wonderful friend, Cyndye, coaching me along plus providing me with the SCOBY… I’m hooked. Healthy living, made affordable, and FUN! Thank you…

  12. Shawna Avatar

    Hi there,
    I’ve been making kombucha and water kefir for a while now. One problem I always run into, and haven’t see addressed on any blog, is what to do with the last bottle that isn’t quite full. Could spring or distilled water be added to fill it?

  13. Donna Avatar

    “1/2 cup of liquid from a previous batch of Kombucha”
    If you’ve never brewed Kombucha, how do you get liquid from the previous batch?

    1. Ana Avatar

      There are tutorials on how to make your own Scoby if you don’t want to buy one off the internet. Previously i had bought one on Etsy with good results. This time, I bought one bottle of GT’s Synergy original kombucha (unflavored), and poured it into my brewing vessel, covered, and let it sit in a warm place, undisturbed. After a couple of days, I poured in one cup of room-temperature sweet tea, and a couple of days after that I had a 1/4″ thick Scoby plus enough liquid to start brewing.

  14. Julie Clanton Avatar
    Julie Clanton

    How do you make your 1st batch when you need a 1/2 cup from a previous batch?

    1. Ana Avatar

      You can buy a bottle of UNFLAVORED kombucha at the health food store; you can buy a Scoby online, or you can make your own Scoby with a bottle of unflavored kombucha from the heath food store.

  15. Ashley Mac Avatar
    Ashley Mac

    I am gathering my Kombucha ingredients! What kind of tea should I use?

    1. Ana Avatar

      Black tea! Or my favorite, a mix of half green, half black. I love Taylor’s of Harrogate Assam black, but even Lipton will work. Avoid flavored tea because it can kill your scoby or impair the brewing process.

    2. Julia Avatar

      I bought some white tea, what I didn’t realise was it had vanilla in it. It’s made the most wonderful flavoured KT yet and is lovely and fizzy.

  16. Beth Frampton Avatar
    Beth Frampton

    Ok, I have a question. I bottled for the second ferment in flip top, clear, glass bottles. There is something growing in one of the bottles, and it’s pretty big. Can a scoby grow in an anaerobic environment?

    1. Ana Avatar

      How much headspace did you leave when you did your second ferment? 1″ to 1.5″ headspace is ideal when you fill your bottles. As they ferment, there will be strands of culture in the bottles, it can even look like a “brain” or something out of Halloween! I also recommend sterilizing your bottles in the dishwasher before brewing. If none of the other bottles have it, depending on how it looks, I might throw it away?

    2. Tracy Avatar

      In almost all of my second brew bottles (I’ve done 3 gallons, now on 2 more), a scoby began to form. When I used juice, the new scoby formed at the top of the bottle; when I used fruit pieces, the new scoby formed attached to the fruit. These mini scobys have been clear and rubbery-ish.

      I also get some large yeasty growths that float, but those have formed in the first fermentation and they are brown and stringy.

      I’d say if your “growth” is any color besides clear or tan, be cautious as it could be a bad mold. Some things to consider: Have you been sealing the jars tightly (in your case, your bottles need to have a rubber gasket)? How long do you leave them out for second fermentation (I believe the recommendation is 2-3 days, tightly sealed before moving them to the fridge)?

  17. Beth Frampton Avatar
    Beth Frampton

    I left my kombucha on the counter too long, and ended up with vinegar. Yuck. Have I killed my scoby?

      1. LisaS Avatar

        Do you start a completely new batch or do you just add fresh sweet tea to your vinegar brew? Mine’s literally been sitting for about 7 months.

  18. Christy Avatar

    I have well water and if I allow my tea to sit out over night it grows mold.Will the scoby prevent the mold from growing or do I need to purchase filtered water? Thanks!

    1. Ana Avatar

      I have heard that well water is great for kombucha, but if you are having this issue I would use filtered water. If that is not an option, boil the well water uncovered for 10 minutes before starting your sweet tea.

Leave a Reply

Your email address will not be published. Required fields are marked *

Recipe Rating