

Maybe you’ve seen microgreens at your local farmer’s market or farm to table restaurant. These little green plants are similar to sprouts, and just as packed with nutrients. Growing microgreens at home is really easy and offers so many health benefits!
What are Microgreens?
Microgreens are miniature plants of greens, herbs, or other vegetables. Like sprouts, they’re a concentrated nutrient source and packed with beneficial enzymes thanks to their rapid growth. While sprouts are grown without soil and are sprouted seeds, microgreens rely on soil or another growing medium.
Microgreens are popular at gourmet restaurants because of their distinct flavor and presentation. You don’t have to go to a fancy restaurant though to eat microgreens! Our local health food stores sell them, but I’ll often grow my own microgreens because it’s much cheaper.
They’re simple enough to grow that you can easily have a fresh plant source in your kitchen year round. One downside to sprouts is their potential to grow bacteria (which is rare) because they’re grown in the air and not soil. With microgreens you’re eating the stem and leaves, not the seed and root.
Are Microgreens Good For You?
In a word, yes. Research shows that microgreens have 4-40% more micronutrients compared to full grown herbs and veggies. Microgreen benefits include getting fiber, minerals, and vitamins our cells need to thrive. And the benefits of microgreens don’t stop there. You’ll also find antioxidants to fight free radical damage.
Types of Microgreens to Grow
The most commonly used plants for growing microgreens are:
- Lettuce
- Kale
- Spinach
- Radish
- Beet
- Watercress
- Herbs
- Greens
- Cabbage
- Mustard
- Chia
- Sunflower
- Buckwheat
- Clover
- Kholorabi
- Peas
Any edible plant that is entirely edible (root to leaves) can technically be used, but the ones above are the most common and taste the best. If you’re looking for the best microgreens for beginners, broccoli and radish stand out.
Can I Grow Microgreens in Potting Soil?
Yes, potting soil works well with microgreens, but it can get a little messy. I prefer organic potting soil to avoid unwanted pesticide residue. Potting soil usually has some fertilizer mixed in for faster grow time. Just be sure when you’re trimming off the microgreens not to get the dirt along with it.
Another option is coconut coir or coco coir. Made from fibrous coconut hulls, it holds up to ten times its weight in water and is naturally resistant to fungus. It does not have a lot of nutrition in it so you can mix in a little fertilizer or use a 50/50 blend of soil and coco coir.
If you want to grow microgreens at home without soil (hydroponically), then a hemp mat is a great option. You can grow microgreens in water with a hemp mat and sow the microgreen seeds directly onto that. For this tutorial though I’m focusing on growing seeds in soil (which can impart more nutrients).
How to Grow Microgreens in a Mason Jar
You can grow seed sprouts in a jar, but you can also grow microgreens that way. Simply follow the same steps as below, but instead of using a shallow container, use a wide mouth jar. The downside to using a jar is that depending on the jar’s size you might not get many greens and they can be harder to harvest.
How to Grow Microgreens in a Tray
This is my preferred method. You just need a shallow, sturdy tray. Some people use plastic microgreen trays, but you can also use glass or compostable ones.
Here’s how to grow your own microgreens!
What You Need to Grow Microgreens at Home
- A shallow tray with drainage holes
- Organic potting soil
- Coconut coir (optional)
- A warming mat to speed germination (optional)
- A grow light (optional)
- Microgreen seeds
How to Grow Microgreens:
- Find a south-facing window with plenty of sunlight or install a growlight. I’ve found that a growlight mounted under kitchen cabinets works perfectly for growing greens on the counter if you have the space to do it. In warmer months, these can also be easily grown outside.
- Place an inch of organic potting mix in the bottom of a shallow tray or planter. You can also use a 50/50 mix of soil and coco coir. Smooth the soil out evenly.
- Thickly scatter seeds evenly over the soil surface.
- Cover the seeds with a thin layer of soil and spray the surface with clean, filtered water. I use a glass spray bottle.
- Place on the warming mat, if using, and under the grow light or near a sunny window.
- Mist the seeds a few times a day to keep the soil evenly moist while waiting for the seeds to germinate. You can also put a small fan on them to give them a gentle breeze, deter mold, and improve growth.
- Greens are usually ready to harvest in 2-4 weeks, depending on the type of seed used.
- To grow another crop, either remove the roots and replant or dump the entire tray in the compost and fill with more soil mix to replant. If you dump in the compost, some straggler seeds usually volunteer and make a crop of their own a few weeks later.
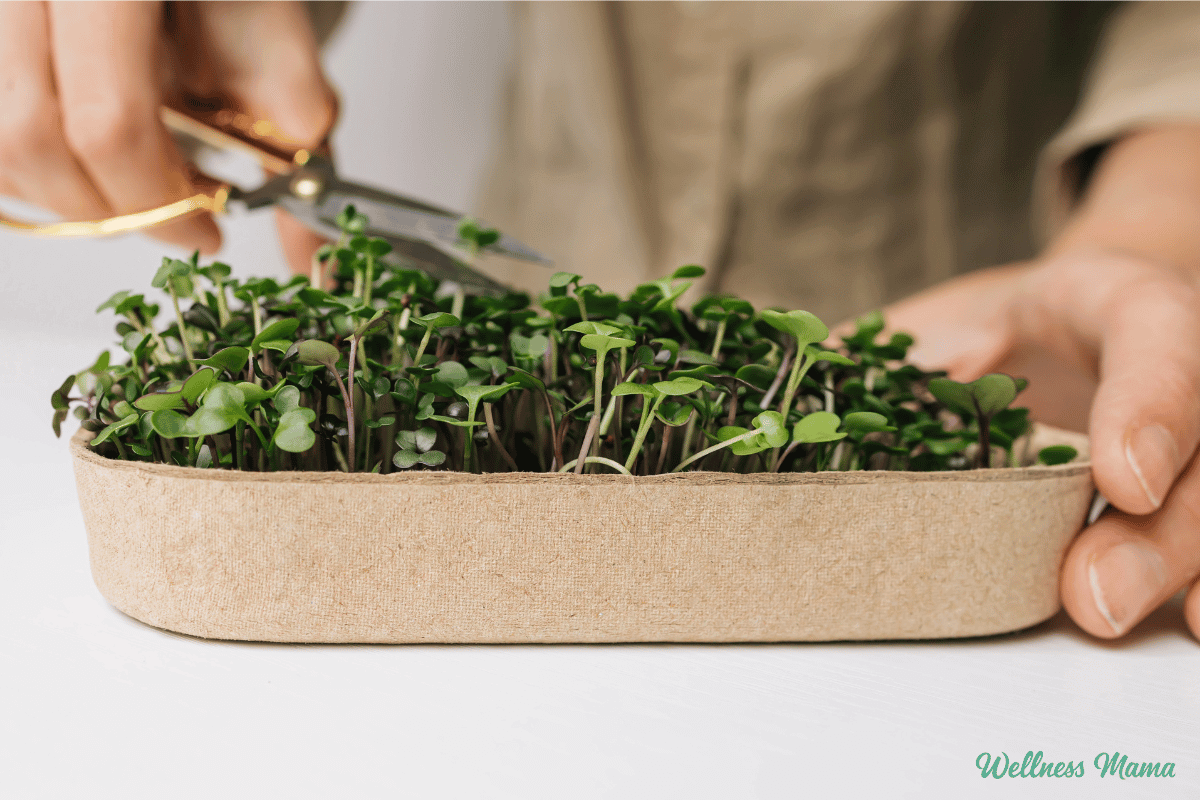
- Cut microgreens right above soil level with kitchen shears. Store in the fridge and rinse right before use.
TIP: Soaking the seeds overnight will speed sprouting time, but make it more difficult to scatter them.
You’ll spread more seeds than you would if just planting the seeds to grow to full size. Since they’ll only get 1-2 inches tall and you want to harvest as many as possible from each tray.
Troubleshooting Common Microgreen Growing Problems
My seeds won’t sprout – They may not be getting enough light or it may not be the right temperature. Microgreens are versatile, but the ideal soil temperature for seed germination is 60-75 degrees. The air around the soil should ideally be between 60-70 degrees. Microgreens take 7-21 days before they’re ready to harvest. Or your seeds may be too old to germinate.
Why are my sprouts fuzzy? – The seed roots are often naturally fuzzy, this doesn’t necessarily mean it’s mold. If it’s slimy, doesn’t wash off, and is growing on the greens, then it’s mold.
There’s mold growing on the soil – If you do have a mold problem, this can be due to too much water or a drainage issue. Your microgreen trays also need good airflow to deter fungal growth. Mixing some coco coir into the potting soil helps improve drainage too.
Do I need plant growing lights? – You don’t need them, but they can be helpful, especially on darker winter days. If you don’t have a plant light, pick a very sunny windowsill.
My microgreens are tall and falling over – If you’re using a light source that’s too far above the microgreens or poor quality, it can cause them to get “leggy.” The stalks have to stretch too high to reach the plant growing light.
Do Microgreens Regrow After Cutting?
Certain seeds might give you a little bit of a crop after harvesting, but not much. It’s best to compost the soil medium after you harvest and start fresh. Experts generally recommend not reusing the same soil for microgreens because of disease risk and lower yields. If you have a compost pile going in the backyard though, then you can incorporate some of your finished compost into your microgreen soil mix.
How to Eat Microgreens
You don’t need any special microgreens recipes to use them. They work well on top of any kind of salad and most dishes. Try them on top of some grain-free eggs benedict, a burger bowl, or garnish for some soup. Microgreens can work on top of almost any savory dish!
Have you ever grown your own herbs or plants inside? What are your favorite ways to use microgreens? Leave a comment and let us know!

Leave a Reply