
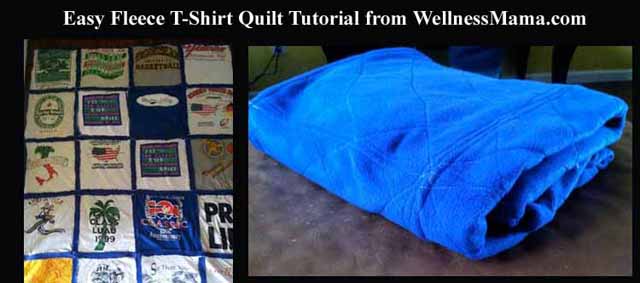

I came up with the idea for this quilt when my husband decided he had too many shirts from college and was going to get rid of a bag of them. He would never be able to wear all these shirts, but they represented memories for him and I wanted to preserve them.
I looked into options of having them quilted with a quilting machine, which looked great, but had a lot more steps and was going to cost several hundred dollars. I’d have to send it off to have it quilted and there wasn’t even time to finish it before Christmas.
This left figuring out a way to do it myself. I had the idea of using fleece as a backing and leaving out the batting entirely, but every search I tried online said it wasn’t a good idea and the lady at the fabric store said it couldn’t be done.
I highly recommend this type of t-shirt quilt for several reasons:
- No hand sewing required
- No interfacing, starch or other backing needed
- No batting or inner layer needed
- Easy to sew
- Really warm!
- Machine washable!
What’s this? Can’t be done?…. a Challenge!
I found fleece on sale for $3 a yard and bought three yards. In hindsight, I would have gotten a couple extra yards in case I needed it, but three yards was just enough for a 5 shirt by 4 shirt quilt (16 inch blocks).
After some trial and error, I figured out a pattern that I (hoped) thought would work and decided to give it a try. The confounding factor was that I had two weeks to get it done before Christmas and I could only do it while my hubby was gone and had to have all trace of it cleaned up before he got home so he wouldn’t suspect it.
Add four kids to the mix and I really wasn’t sure I could finish it by Christmas. Thankfully, the pattern worked and turned out to be easy!
I finished this is about 8 hours total (split up over about 5 days when he wasn’t home) and the end result is a very soft, warm and machine washable quilt!
My next project is to make smaller versions for the kids from some of their baby clothes that have special memories.
If you have some old t-shirts that are full of memories, this is a great way to up-cycle them and make them useful.
Materials & Supplies Need for Quilt
- old t-shirts
- fleece (all one color, or a mix if you want a patch-work back also)- about a yard per every 5-6 shirts
- A lot of thread! I went through 2 spools. I used white so it would show on the back but any color would work.
- Pinking shears (optional but recommended) or fabric scissors
- A paper grocery bag or large piece of cardboard
- A marker, pencil or colored chalk
- A lot of pins
- A sewing machine
- A large flat surface (I used the floor)
- Patience 🙂

How to Make The Fleece T-Shirt Quilt
- Cut a 16×16 inch square from the paper bag or cardboard. This is your pattern for each square.
- Lay the pattern over the back or front of each shirt (whichever part you want on the quilt) and make sure the design is centered as much as possible.
- Use the marker, pencil or chalk to draw around the pattern onto the shirt. I used a permanent marker and just
cut right inside the line so no marker was left on the part of the shirt that would be in the quilt. You could just try to cut around the pattern, but I found that it is very difficult to keep the shirt from moving and creating an uneven square. (TIP: Save the extra pieces of t-shirt and cut into smaller squares to use for cleaning rags)
- Once all the shirts are cut out, use the pattern to cut out an equal number of fleece squares.
- Match up each t-shirt with a fleece square with back sides together and the good side of the t-shirt and the fleece facing out.
- On each square, sew the diagonal pattern (see tutorial picture). Sew diagonally down one side first. Then, move out approximately 3.5 inches on either side and sew. Move another 3.5 inches from each of these and sew again. This will make a total of 5 diagonal “seams” through the t-shirt.
- Repeat the same diagonal 5 seams, going to opposite way (see picture if this is confusing). This will leave a diagonal quilted pattern on each square.
- Repeat with all squares.
- Once all squares have been “quilted”, sew t-shirts into rows first and then sew the rows together to make the quilt.
- To sew rows: Put the backs (the fleece side) of the squares together and sew with a 1/2 inch seam allowance. This will leave 1/2 inch of rough edges on the front side of the quilt. If you are using pinking shears, trim the seam allowances at this point (very slightly) to leave a zig zag edge.
- Fold each side of the seam over and sew 1/4 inch from the original seam to make a 1 inch border between squares (see picture)
- Continue to do this to create all the rows.

- When rows are done, place two rows together with backs touching so that seams will show on the front side of the quilt.
- Sew with 1/2 inch seam allowance, trim with pinking shears if using. Fold down and top stitch at 1/4 inch to leave 1 inch border between rows. (The same way you did between squares)
- Repeat this until all rows are together.
- For the outside edges: Fold them over 1/4 inch, then 1/4 inch again for a total of 1/2 inch folded over. Top stitch in the middle of this to create a finished edge (see picture). Alternatively, you can trim around the whole thing with pinking shears and just fold over once at 1/2 inch to create a zig zag border on the edges as well.
- Trim all threads (this takes the longest!)
- Enjoy your quilt!
Note: I am definitely not a professional seamstress and probably didn’t even use the correct terms in the instructions above. In the name of full disclosure, I also admit that while I measured each square to make sure it was 16×16, I did not measure each diagonal seam on each square. I just estimated and it came out ok.

For more DIY gift ideas, check out this post.
Ever made a quilt using old/worn out t-shirts? Have questions on following this tutorial? Share below!

Leave a Reply