

Fun fact… I have a long running habit of secret things I only do when my husband leaves town. If you guessed drinking wine or watching chick flicks… you’d be wrong. Remodeling and DIY projects are my guilty pleasure, but he hates messes (and getting roped into projects) so I normally only do them when he is traveling for work.
I usually plan in advance so I have everything on hand and can execute projects quickly in the few days he is gone. In the past, I’ve painted whole rooms, installed a rock wall above our fireplace, and built sliding barn doors and a coffee bar.
Why DIY?
I joke that I have Restoration Hardware taste but like to stick to a Target + Home Depot budget when remodeling. While I’m no Ana White, some of my favorite parts of our house are things that I was able to make myself at a tenth of the cost of buying them or having them made. On top of that, I love the feeling of tackling a big project and seeing the end result.
So… I’m the nerd who is asking for a second cordless drill for Christmas (hint hint honey) so I don’t have to keep switching back between a drill bit and a Phillips bit.
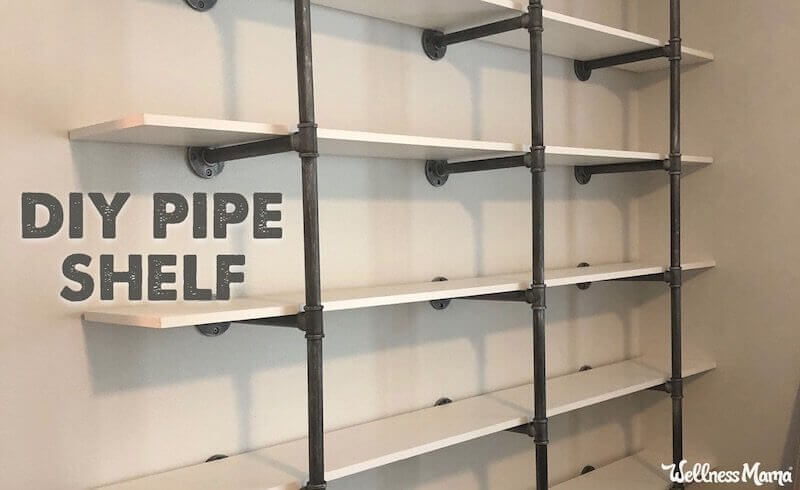
DIY Industrial Pipe Shelves: How To
If you’ve ever priced out any home improvement projects, then you know contractors are expensive, and any type of hardware or home improvement equipment has gotten really pricey. I needed some new shelves in our office that could hold a ton of books (we’re book addicts) and didn’t like any of the options available.
Instead, I ordered two kits of pipe shelf pieces online and pieced them together to be the size I needed. I bought some pre-painted boards as the shelves. (And had my dad help me cut them down because I’m still a baby when it comes to saws).
The entire project took a few hours and cost a couple hundred dollars and I’m very pleased with the results. Every space and project is different, so I’m explaining how I figured out what I needed and made it fit in the space we had available. If you’re tackling this in your own home, just adjust the size and supplies to your own needs.
Homemade Pipe Shelf Supplies
The beauty of industrial pipe shelves is that the pieces are already the right size and easily screw together. Most of the work of building just requires screwing the pieces together in the right configuration for your project.
I’ll also let you in on another secret… I cheated a little on this one and used a combination of kits because it was actually cheaper this way. You can buy all of the pieces separately, but my local store never had enough in stock and the kits come with all the pieces I needed.
I ordered two of this 5-layer x 3 shelf kit for this project (see details below).
To figure out what supplies you need, measure out your space and figure out the number of shelves you want. Sketch out the design and calculate how many pieces you need to make the desired height and number of shelves. For this project, I was using three sets of support brackets and making seven shelves.
What I Used (Adjust for Your Project)
- (42) 12-inch pipes
- (3) 18-inch longer ones to connect to the ground
- (3) elbows (for the top shelf since I wasn’t going all the way to the ceiling)
- (18) tee-connectors (to connect each vertical piece to the horizontal piece that connects to the wall)
- (24) flange (wall mounts to connect to studs at each shelf and one to connect to the floor on each support)
- (7) 1-inch boards for the actual shelves (mine were 6 feet long and 10 inches wide)
Like I said, it can be tough to find enough of those pieces at a hardware store but the two kits had more than enough pieces.
How to Make Pipe Shelves
Once you have the design and the pieces, the actual assembly is pretty quick and easy. Here’s how to assemble the pipe shelves:
- Start screwing the pieces together to match your design. I found it easier to assemble each support bracket separately and have them ready to all attach to the wall at once.
- Find a stud for as many of the support brackets as possible. Most studs are 16-inches apart and you can use a stud finder and a tape measure to identify them. Since flanges are wider than studs, only two of the screws will be able to make it into the stud but this provides plenty of support. For this project, I was able to get the two outer support brackets in to studs and used drywall anchors for the middle ones.
- TIP: Make sure all support brackets are symmetrical and the same size before you start screwing into the walls! The treads on the screws can vary and for level shelves, it is really important to make sure they are all the same height! Double check this as you start attaching to the wall as well.
- Once all support brackets are screwed into the walls, screw any bottom flanges into the floor, if needed. I was hesitant to screw into our hardwood floors so I skipped this step. Instead, I cut a small piece of rubber shelf liner to go under the flange to keep it from shifting or hurting the floor and just rely on gravity to keep them from moving.
- Make sure shelves are cut to size. I opted for pre-painted white shelves but had to trim down the width. I bought 6 ft x 1 x 12 boards and had to cut them down to just over 10 inches wide to fit in the shelf correctly.
Additional Tips
You can use tension clips or “u-clips” to hold the shelves on to the support brackets. I found this was not necessary since my shelves are holding books and are not going anywhere.
For the shelves themselves, you can use reclaimed wood, painted wood or stained wood… or really any other type that is strong enough to hold what you are going to put on it.
Make sure to find studs, especially if you’re making hanging shelves and not anchoring to the ceiling or the floor.
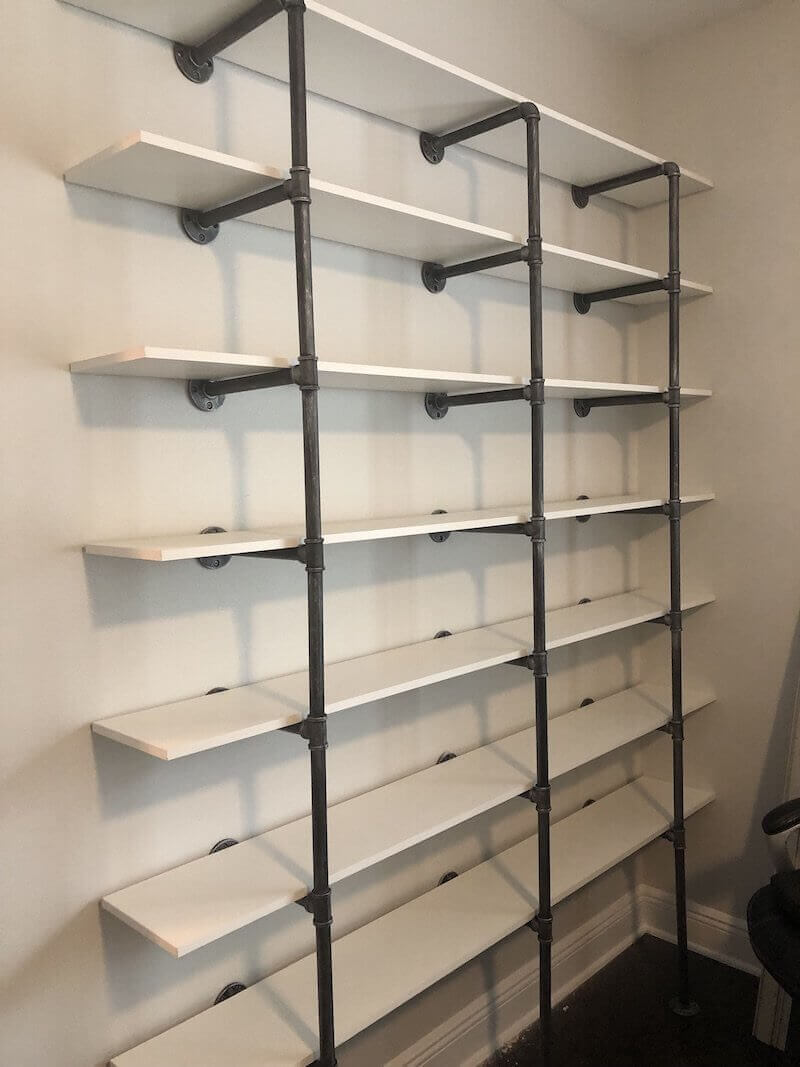
Ta-Da! The Finished Shelves!
In case you’re curious (and if you read all of this you probably are!), here is the finished result!
Questions? Ask me in the comments! I’d love to hear if you use this tutorial and how it works for you.

Leave a Reply