How to Make Your Own Produce Bags

Katie Wells Avatar

Reading Time: 5 minutes

This post contains affiliate links.

Read my affiliate policy.

How to make your own plastic free produce bags
Wellness Mama » Blog » Natural Home » How to Make Your Own Produce Bags

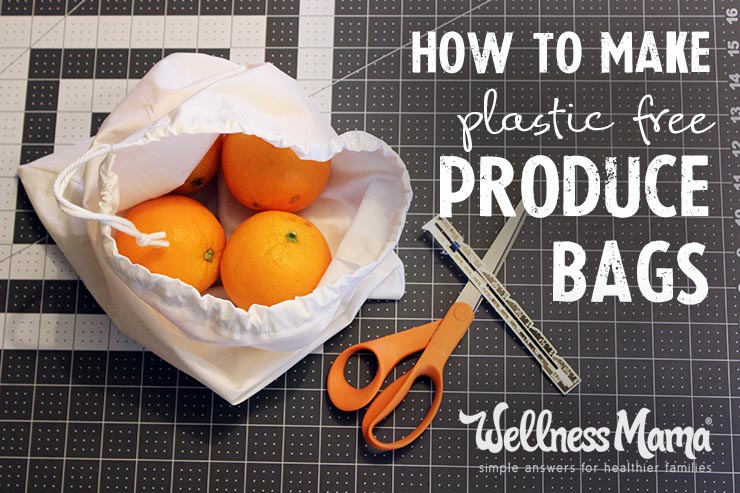
Imagine yourself in the grocery store picking out the perfect collection of organic apples. You look around, only to discover that you have no option other than to put your fruit into a plastic bag. Not only are they thin and easily torn, they expose your food to the dangers of plastic and have a negative impact on the environment.

There are many non-plastic options for produce bags but did you know they are incredibly easy to make yourself? In fact, I spent more time setting up my sewing supplies than I did actually sewing! (Only very basic sewing skills are required for this super easy DIY project.)

Depending on the supplies you use, these reusable produce bags can be made for next to nothing. You can repurpose a worn or out-dated t-shirt and a spare shoelace as a drawstring for a virtually free bag.

No matter what supplies you use, this easy tutorial will show you how to make you own produce bags to take along on your next shopping trip.

Homemade Produce Bag Supplies

Make your own mesh produce bags
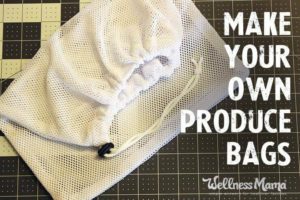
Fabric: This is a matter of preference. I have used both organic cotton muslin and a lightweight polyester mesh with a light stretch. As I mentioned above, an old t-shirt or any other lightweight fabric you have on hand will work well. Remember that your bag will be weighed along with your produce so you don’t want to add more weight than is necessary.

I did make sure that the fabric was washable before I chose one. Some mesh fabrics require special care when washing but I want to be able to toss it in with my regular laundry if/when it becomes soiled.

The organic cotton muslin was the easiest to work with and cinched very well with the drawstring, so this is what I would recommend for a beginner. Plus you have the added benefit of using organic fabric.

Bag Closure Options: There are several ways you could finish the top of your produce bags:

The absolute easiest way would be to just finish the edge with a simple hem. This technique would leave the top of your bag open similar to the plastic bags provided at the store. The drawback would be that your produce would have the possibility of falling out of the bag. However, you could use a silicone bag clip to fasten it, keeping everything safely inside.

Another simple solution is to use elastic. I would not recommend this if you buy a lot of bulk nuts or other small items but it works great for larger things like apples, tomatoes, and avocados. Just measure a piece of 1/4″ wide elastic (measure with the elastic fully stretched) the same length as the circumference of your bag plus 1/2″ for overlap. Then insert it into a casing the same way you would for an elastic waistband.

The closure type I most prefer is a drawstring. I purchased a 1/8″ cable cord and also later realized that a large round shoelace would work well. The cotton muslin stayed closed quite well but the mesh slipped a bit on the drawstring so I put a cord lock on that bag for added security.

Other Supplies

  • Sewing machine
  • fabric scissors or rotary cutter and quilting mat
  • measuring tape or quilting ruler if you are using a rotary cutter
  • thread
  • safety pin for inserting drawstring
  • iron for pressing hems and seams (not necessary but helpful)
  • sewing pins (not necessary but helpful)

DIY Produce Bag Directions

This tutorial will show you how to make a drawstring produce bag that is roughly 12″ wide by 14″ long using a lightweight organic cotton muslin. Use 1/2″ seam allowances unless otherwise stated.

1. Lay your fabric out so that it is 2 layers thick.

2. Cut a 13″ by 16″ rectangle (this will give you 2 pieces).

Make your own produce bags- step 2- cut the cloth

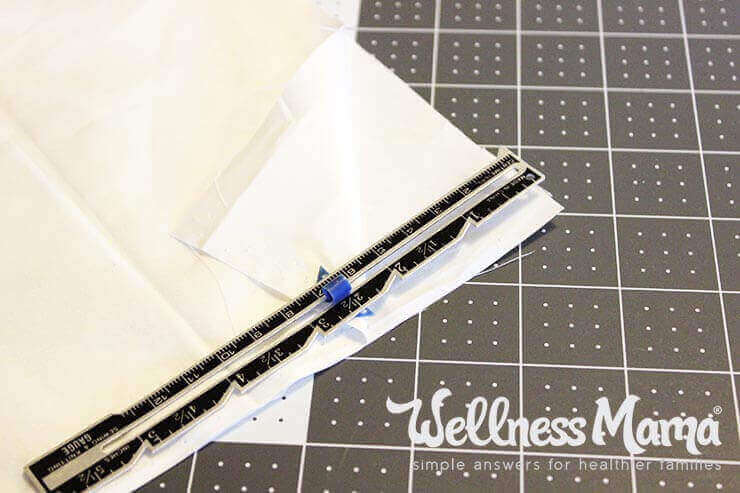
3. With the 2 pieces together, measure down 2.5″ on one of the long ends. Mark this spot with a straight pin. You will leave these 2.5″ open to leave room to make the drawstring casing.

4. Starting at the straight pin you placed in step 2, sew a seam around the rectangle on 3 sides, leaving the last side (top of bag) and the 2.5″ on the side open.

5. Along the top edge, fold over 1/2″ to the wrong side and press with your iron.

6. On the side with the open section, press open the seam allowance including the 2.5″ opening.

How to make your own produce bags- step 6- sew the bag

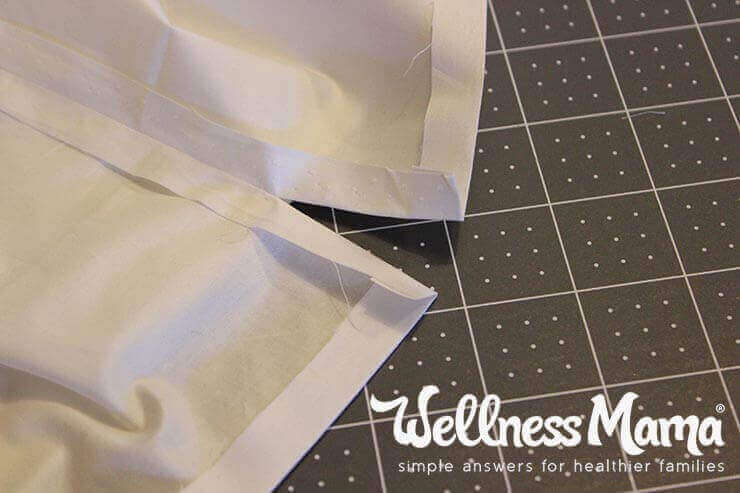
7. Starting at the top edge, stitch down to the bottom of the 2.5″ opening. Stop, pivot, and sew across the side seam about 1″. Stop, pivot, and sew back up the other side, ending at the top edge.

Make your own produce bags step 7- sew the opening

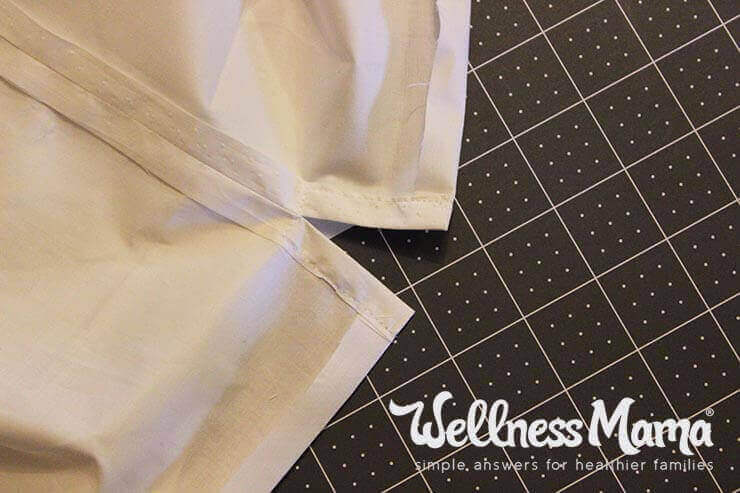
8. To make the casing for the drawstring, fold over 1″ around the top edge to the wrong side and press.

9. Stitch all the way around just inside the bottom of the 1″ fold forming a casing for your drawstring.

Homemade produce bags step 9- sew the drawstring

10. Cut the 1/8″ cable cord long enough to go all the way around the bag through the casing and have enough to tie a knot. I cut mine about 34″.

11. Wrap a piece of tape around each end.

12. Put the safety pin through one taped end of your cord and use it to feed the cord through the casing.

13. Put both ends together and tie an overhand knot.

I also made a smaller size that would be handy for buying things like kiwi, ginger root, or 3-4 average sized apples. The finished size of the smaller bag was 8″x 10″ so I cut the initial pieces 9″x 12″.

Homemade produce bags size comparison

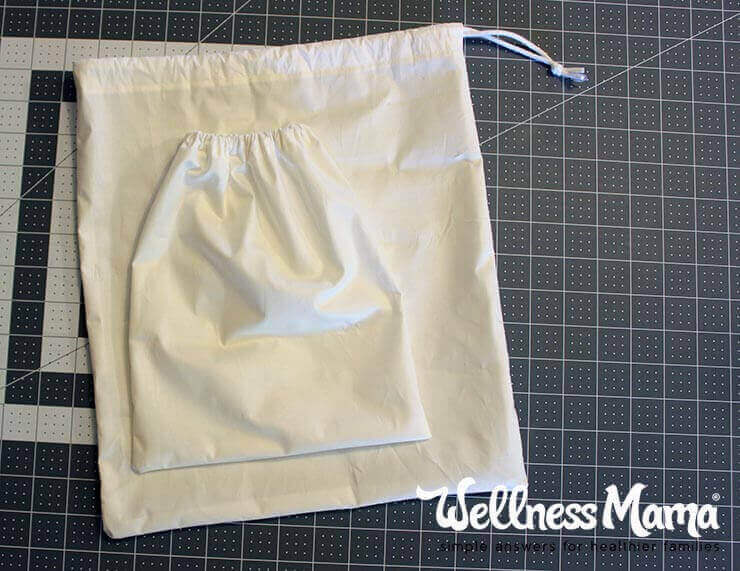
You can really make any size you would like. Just take the finished dimensions you want and add 2″ to the long side of the bag (so you have plenty of room to make the casing for the drawstring) and 1″ to the width.

Making the switch to cloth produce bags is an easy way to reduce plastic use in your daily life. Here are some other tips.

Ever made your own grocery bags? What other changes have you made to avoid plastic?

Katie Wells Avatar

About Katie Wells

Katie Wells, CTNC, MCHC, Founder of Wellness Mama and Co-founder of Wellnesse, has a background in research, journalism, and nutrition. As a mom of six, she turned to research and took health into her own hands to find answers to her health problems. WellnessMama.com is the culmination of her thousands of hours of research and all posts are medically reviewed and verified by the Wellness Mama research team. Katie is also the author of the bestselling books The Wellness Mama Cookbook and The Wellness Mama 5-Step Lifestyle Detox.

Comments

48 responses to “How to Make Your Own Produce Bags”

  1. Erin Avatar

    I really loved your idea of this DIY bags. They’re easy to make and eco friendly too.. I’m always in for anything that serves nature! Lately, I wanted to buy some customized shopping bags for the small shop I own and when I looked for it, I found a site called ProImprint, where they have lots of ecofriendly bags that I could use for mine and they were really cheap also.
    But looking at your idea of making a bag for yourself, I would wanna try gift this bag for my regular customers as a special token! Hope this idea works and brings more customers into my shop too!!

  2. Dale Avatar

    How do the store clerks quickly see what is inside the bag in order to ring it up? I would think if you took a sticker off of a piece of fruit and put it on the back it would fall off.

  3. Beckie Carruthers Avatar
    Beckie Carruthers

    Hi. I’m really interested in making this transition of plastic bags to reuseable bags. Question is what time of material is suitable for greens (if there’s such thing)?

  4. Michelle Avatar

    You can make freezer bags out of oil cloth with velcro closures. Don’t use ready made oilcloth, it’s synthetic. Instead, make your own.

  5. Jessie Speirs ND Avatar
    Jessie Speirs ND

    I would also love a good solution for freezing bags! as well and wet produce like lettuce in the fridge!

  6. Mary Avatar

    I have been on a long search for what kind of containers to use in the freezer other than glass. I freeze a lot of home grown berries and would like to use a fabric type bag. I could close it with velcro like the plastic bags but is there a certain fabric I need to use that would best keep in the freezer and hopefully, something organic.

  7. Marilyn Avatar
    Marilyn

    I don’t know where else I could comment about my problem, so I’m putting it here. First of all, let me tell you, I am one of your biggest fans even though I am almost 80 I still often learn something new from your site. Of course I don’t have little ones to tend to any more but much of your information applies to us older folks also. I grow a lot of my own herbs (plaintain and comfrey grow wild in my garden) and I get a lot of information from your recipes. My problem: I signed up for the ultimate bundle and paid for it. but it is so confusing (I know, I’m old) I can’t get anything to open up. I like your web site format, where you write about something and if we want we just print out a copy of your info or recipe, which I do all the time. That’s what I thought the ultimate bundle was going to be like. If possible I would like my money back, but I don’t think that will happen. I will continue to subscribe to your site and learn from it like I have been doing. Thanks for all your research and information, it helps a lot of us to save.

    1. Ryan Langford Avatar
      Ryan Langford

      Hi Marilyn! This is Ryan from Ultimate-Bundles.com, where you purchased your bundle.

      First of all, thank you for your inspiring example of the growth mindset. I aspire for others to say the same thing about me when I’m 80.

      Second, I totally understand about the bundle, and we’ll be more than happy to refund it for you. I’ve asked our customer happiness team to look you up in our system, initiate a refund for you and email you confirmation when they’re back in tomorrow (Monday). If you have any more questions or concerns, please feel free to contact me directly at ryanl (@) ultimate-bundles.com

  8. Mari Avatar

    If you cannot afford a sewing machine, maybe borrow one, visit someone who has one or maybe there is a place where you can go and use one? If not, why not hand sew, people used to do that for centuries and the bags are not big. I’m really bad at needlework etc but even I can manage that. I bought my first bags about twnty years ago and later made new ones by copying the model. They were polyester with a cotton drawstring. I’ve also seen some women use wash bags for this purpose. (I’m not sure if that’s the correct term, I mean the bags you put your delicate laundry in for washing in the washing machine.)
    Also, I don’t know if it’s forbidden where you live, but here you can weigh you fruit and vegetables before putting them into the bag.

  9. Mary Jo Avatar
    Mary Jo

    I would think you could also have a tight closure on the bags using velcro to act like the ziploc bags. I was wondering if anyone uses these in the freezer to store food?

  10. Amy Avatar

    I made some for my son’s lunch box (also “Momma-made”) to use for his dry snack items. They work really well and he loved picking out the fabric. I used pinking shears to keep the seem allowances from fraying. By cutting 8X8 squares just a single yard of 45″ fabric makes 10 bags. They last “forever” and the cost in the long run is a fraction of what just a single box of ziploc bags are. No matter what the size/use its a win-win!

  11. Jessie Avatar
    Jessie

    Do you use these for everything? Even Lettuce or greens that will dry out or wilt in the fridge? The only place I haven’t found a good replacement for plastic is for moist fridge items and for freezing things like berries, fruit etc.
    I would love some ideas for those!

    1. Yvonne Avatar

      I put my lettuce in a stainless steel bowl and cover it with a wet towel. It stays fresh and crisp.

  12. Annie Avatar

    Jodi,

    Great idea. I shop at a market that sells mostly organic, but many think I’m crazy for spending a Little extra for organic. I can’t imagine bringing in these bags! And I’m a big shopper. I live in a small town in California.

    Amazon does sell a organic type of material cover to wrap your food in, instead of using Saran Wrap, wax paper, etc.

  13. Ann Avatar

    Simplified cutting and sewing (replacing one side seam with a fold): Instead of Katie’s cutting instructions, cut one rectangle twice as large as you want. Fold it in half and sew the side and bottom seam. (Wish I could draw you a picture.) Continue as Katie directs.

    I make my own bags that I use for meat. I used a free pattern I found online. Old pillowcases and old laundry bags can also be used. A reusable bag from the store or a plastic sack end up in the trash can if meat leaks in them. But a cloth bag can be laundered.

  14. Jodi Mundson Avatar
    Jodi Mundson

    Have to admit that I had never thought about this until about 6 months ago, when I saw something on another web site about produce bags. My first thought was “OMG, that is so right!” But then I looked at the price of the bags they were selling, and while they cost a pretty penny, they looked really cheap. My BFF and I were talking about it, as we were crafting away, and it suddenly hit me… DUH, I could knit produce bags! After all, I have tons of crochet cotton in very small sizes. Pattern is pretty easy, just cast on about 25 stitches per side using Judy’s Magic Cast On, or Turkish Cast On (like you are going to make toe up socks) and knit until your bag measures about 8-12 inches from top to bottom. Cast off. For draw string, you can either do a YO, k2tog around about 5 rows below the cast off, or sew down a casing after you cast off. You can either finger crochet a drawstring or use a shoe lace.

    These are easy to do because it is just knit around and around and around, until you get bored with it. I’ve made 5 of them, and one of the cashiers at my local store admired them so much, I gave her one to use herself. These knit bags probably weigh less than the plastic bags, and are completely reusable, and washable. <

  15. James P Avatar
    James P

    Thanks for your post, but I think it bears reminding that any reusable bag you use or make needs to be washed regularly and washable – especially if you are using it for produce, and especially if it’s made of a natural cloth. It would be unfortunate to put all that effort into avoiding plastic only to contaminate your produce with E.coli and other bacteria. There were news stories on this topic a couple years ago, e.g. https://health.clevelandclinic.org/reusable-grocery-bags-and-bacteria-video/.

    As long as the bag is strong enough to stand up to a hot wash, I’ll definitely be doing this myself, or I’ll stick with the big cardboard box that some stores let you have/take.

    Thanks again.

Leave a Reply

Your email address will not be published. Required fields are marked *