Mobile Menu

  • Home
  • Start Here
  • About
  • Resources
  • Podcast
  • Blog
    • Health
    • Beauty
    • Mama Wellness
    • Natural Home
    • Natural Remedies
    • Organization
    • Travel
    • Reviews
    • Recipes
      • Beef Recipes
      • Breakfast Recipes
      • Condiment Recipes
      • Dessert Recipes
      • Drink Recipes
      • Pork Recipes
      • Poultry Recipes
      • Salad Recipes
      • Seafood Recipes
      • Side Dish Recipes
      • Snack Recipes
      • Soup & Stew Recipes
  • Newsletter
  • Shop
  • Facebook logo
  • Twitter logo
  • LinkedIn logo
  • YouTube logo
  • Instagram logo
  • Pinterest logo
  • Menu
  • Skip to right header navigation
  • Skip to main content
  • Skip to primary sidebar
  • Skip to footer

Wellness Mama®

Simple Answers for Healthier Families

  • About
  • Start Here
  • Resources
  • Podcast
  • Blog
    • Beauty
    • Health
    • Mama Wellness
    • Natural Home
    • Natural Remedies
    • Organization
    • Travel
    • Recipes
    • Reviews
  • Shop
  • Search
Wellness Mama » Blog » Natural Home » How to Grow Microgreens

How to Grow Microgreens

March 23, 2015 (Updated: July 30, 2019)   —  by Katie Wells

How and why to grow microgreens in your kitchen

Reading Time: 2 minThis post contains affiliate links. Click here to read my affiliate policy.

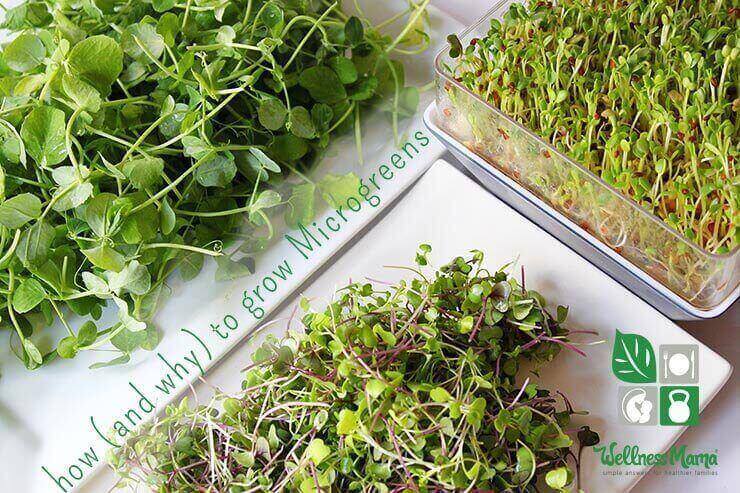
Microgreens are all the rage lately. They are similar to sprouts, but require soil and sunlight (or a grow light) to grow.

What are Microgreens?

As the name suggests, microgreens are just miniature plants of greens, herbs, or other vegetables. Like sprouts, they are a concentrated nutrient source and packed with beneficial enzymes because of their rapid growth.

Though they are often seen in dishes at gourmet restaurants because of their delicate flavor and sophisticated presentation, they are simple to grow on your own and cost very little once you have the supplies. With the right tools, you can have a year-round vegetable source on your kitchen counter.

Microgreens also solve the problem of the potential for bacteria growth in sprouts (though it is very rare) because they are grown in an open-air environment and in soil. Unlike sprouts, only the stem and leaves are eaten, not the seed and root.

What to Grow?

The most common plants used for growing microgreens are:

  • Lettuce
  • Kale
  • Spinach
  • Radish
  • Beet
  • Watercress
  • Herbs
  • Greens
  • Cabbage
  • Mustard
  • Chia
  • Sunflower
  • Buckwheat

Any edible plant that is entirely edible (root to leaves) can technically used, but the ones above are the most common and taste the best. Microgreens add beautiful color and great flavor to salads and are an excellent garnish for meats and other dishes.

Microgreen Growing Supplies:

  • A shallow tray of some sort
  • Organic soil to fill the tray
  • A warming mat to speed germination (optional)
  • A grow light or a sunny spot in a south-facing window (optional)
  • Microgreen Seeds (like these)

How to Grow Microgreens:

  1. Find a south-facing window with plenty of sunlight or install an inexpensive growlight. I’ve found that a growlight mounted under kitchen cabinets works perfectly for growing greens on the counter if you have the space to do it. In warmer months, these can also be easily grown outside.
  2. Place an inch of organic potting soil in the bottom of a shallow tray or planter and smooth out to be as even as possible. Alternately, clear an area of your garden for growing microgreens.
  3. Scatter seeds over the surface of the soil evenly. You will spread more seeds than you would if just planting the seeds to grow to full size, since they will only get 1-2 inches tall and you want to harvest as many as possible from each tray. TIP: Soaking the seeds overnight will speed sprouting time, but make it more difficult to scatter them.
  4. Cover the seeds with a thin layer of soil and spray the surface with clean, filtered water. I use an upcycled glass vinegar bottle with a misting spray top.
  5. Place on the warming mat, if using, and under the grow light or near the window.
  6. Mist the seeds a couple of times a day to keep the soil evenly moist while waiting for the seeds to germinate.
  7. Greens are usually ready to harvest in 2-4 weeks, depending on the type of seed used.
  8. To grow another crop, either remove the roots and replant or dump the entire tray in the compost and fill with more soil to replant. If you dump in the compost, some straggler seeds usually volunteer and make a crop of their own a few weeks later.

To use: Cut microgreens right above soil level with kitchen shears. Rinse with filtered water and add to salads or to garnish almost any dish.

Ever grown anything inside?

FacebookTweetPinLinkedInReddit

Category: Natural Home

Print Friendly, PDF & Email

About Katie Wells

Katie Wells, CTNC, MCHC, Founder and CEO of Wellness Mama and Co-Founder of Wellnesse, has a background in research, journalism, and nutrition. As a wife and mom of six, she turned to research and took health into her own hands to find answers to her health problems. WellnessMama.com is the culmination of her thousands of hours of research and all posts are medically reviewed and verified by the Wellness Mama research team. Katie is also the author of the bestselling books The Wellness Mama Cookbook and The Wellness Mama 5-Step Lifestyle Detox.

  • View All Posts
  • Globe icon
  • Facebook logo
  • Twitter logo
  • LinkedIn logo
  • YouTube logo
  • Instagram logo
  • Pinterest logo

It Shouldn’t Be This Hard to Be Healthy…

Join the Wellness Mama VIP email newsletter to get the latest articles, recipes, podcasts, special discounts, and FREE access to my Quick Start Guide, 7 Simple Steps for Healthier Families, and 1 week real food meal plan!

Wellnesse Products is my very own personal care line created for my family and yours!

I couldn't find natural products that met my standards so I created my own. Wellnesse is the result of a decade of research and dozens of tests, and your family can now use them too!

Learn More

Wellnesse Products

You May Also Enjoy These Posts...

  • The Benefits of Sprouts and Microgreens
    The Health Benefits of Sprouts and Microgreens
  • How to Grow Sprouts in Your Kitchen- and why you should
    How to Grow Sprouts In Your Kitchen
  • How to Grow Sprouts in Your Kitchen for Nutritious and Inexpensive Food With Doug Evans
    336: How to Grow Sprouts in Your Kitchen for Nutritious and Inexpensive Food With Doug Evans
  • Benefits of Broccoli Sprouts
    How to Grow Broccoli Sprouts (& Why We All Should)
  • Benefits of Astragalus Root
    Benefits of Astragalus Root
  • natural kitchen cleaning
    My Natural Kitchen Cleaning Checklist
Previous Post: «How to Grow Sprouts in Your Kitchen- and why you should How to Grow Sprouts In Your Kitchen
Next Post: How to Season Cast Iron Pans How to Season Cast Iron Cookware»

Reader Interactions

Discussion (49 Comments)

  1. Steve

    February 1, 2018 at 10:38 AM

    Typo
    Cover the seeds with a think layer of soil and spray the surface with clean, filtered water. I use an upcycled glass vinegar bottle with a misting spray top.

    I think you mean thin

    Reply
    • Wellness Mama

      February 1, 2018 at 2:17 PM

      Thanks for the catch!

      Reply
  2. Akash

    December 10, 2017 at 1:24 PM

    Can we refrigerate microgreens after cutting?
    If yes, then how long?

    Reply
  3. Thomas Toliver

    October 20, 2017 at 7:46 PM

    Just started to grow microgreens

    Reply
  4. April

    October 2, 2017 at 11:14 AM

    Can you do alfalfa seeds this way?

    Reply
    • Wellness Mama

      October 2, 2017 at 1:28 PM

      Yes.

      Reply
  5. Usman Ahmed

    September 5, 2016 at 3:30 PM

    How is the idea of growig micogreens in pure coco peat.

    Reply
  6. ronda

    March 10, 2016 at 4:23 PM

    please correct typo below. is it thin or thick?

    Cover the seeds with a think layer of soil and spray the surface with clean, filtered water. I use an upcycled glass vinegar bottle with a misting spray top.

    Reply
  7. gary smith

    July 11, 2015 at 12:50 AM

    A well demonstrated article. I like it. Thank you.

    Reply
  8. Lera

    June 26, 2015 at 2:23 PM

    Actually, they don’t even need soil – I use regular wet paper towel inside any container, covered loosely with a lid for green house effect. just spread the seeds on top of towel, make sure the towel stays wet – mess free and fly free.

    Reply
    • Aaron

      August 24, 2016 at 5:08 PM

      I also grow mine on wet paper towels. Works great.

      Reply
  9. Laura

    April 2, 2015 at 7:28 PM

    Do you need to discard the seed and root? Is there a reason not to just eat the whole thing? Especially if using for juice or a smoothy. Thanks.

    Reply
    • Katie - Wellness Mama

      April 2, 2015 at 10:20 PM

      I don’t see any reason why you couldn’t

      Reply
  10. Yasmijn

    April 1, 2015 at 1:11 PM

    Our supermarket just had a huge marketing stunt where you got a little food garden with every 15€ you spent. They were basically little pots with soil and seed paper. There were lots of different ones and some are now on my mantel happily growing. However as I have no intention of growing huge broccolis and such in my tiny appartment, I wondered which would be good as micro greens. Would it for instance be possible to eat micro leek? And what exactly do you mean by greens? (Sometimes my english vocab. is not sufficiant)
    Thanks a bunch!

    Reply
    • Katie - Wellness Mama

      April 1, 2015 at 11:02 PM

      Technically any plant that is edible as a whole when grown (lettuces, kale, broccoli, etc or onions, leeks, etc) would be fine to eat as a micro green. It just means that the plant is consumed when still small.

      Reply
« Older Comments
Newer Comments »

Join the Conversation... Cancel reply

Your email address will not be published. Please read the comment policy.

Recipe Rating


Footer

  • Sitemap
  • Start Here
  • Comment Policy
  • Affiliate Disclosure
  • Newsletter
  • Privacy Policy
  • Terms of Service
  • Full Disclaimer
  • Promo Guidelines
  • Contact
Wellness Mama®
  • Facebook logo
  • Twitter logo
  • LinkedIn logo
  • YouTube logo
  • Instagram logo
  • Pinterest logo

Site Footer

The information on this website has not been evaluated by the FDA and is not intended to diagnose, treat, prevent, or cure any disease.

By accessing or using this website, you agree to abide by the Terms of Service, Full Disclaimer, Privacy Policy, Affiliate Disclosure, and Comment Policy. Content may not be reproduced in any form.

Ads provided by CafeMedia Family & Parenting Network. Displayed ads do not constitute endorsement or recommendation by Wellness Mama.

Copyright © 2006–2021 Wellness Mama® · All Rights Reserved · Sitemap