

I love doing DIY projects but I’m not good enough with power tools to do any fancy work. I don’t dovetail and I haven’t learned how to use a router (yet).
So when I decided to build a coffee station for our kitchen, I knew I’d have to find a simple idea. I wanted a reclaimed barn wood and steel pipe look and I didn’t want to spend more than $100. After researching options, I found a tutorial that I liked but wanted to change. So, I adapted the width and height and used a different type of wood.
After some sketching and trial and error, we have a finished project we love. I’m sharing the details in case you’ve ever wanted to build something similar. It’s easy! Promise. See the full tutorial below.
Also … to give credit where credit is due, I had some help on this project from my dad and one of my sons (as my husband was traveling for work at the time). I couldn’t have done it without the extra hands and double-checking on measuring!
Our Coffee Station Set-Up
The most fun part was decorating and stocking the bar once I finished it. We’re very particular about our coffee and have over time found a way to make the (almost) perfect cup of coffee. We have:
- glass electric kettle to boil water
- 8-cup Chemex for coffee (and a reusable cloth filter)
- burr grinder for grinding the coffee
- Breville milk frother
- high quality organic coffee
I also found some decorative items that help me keep it organized:
Three small lined wire baskets that hold coffee, tea, and supplies.
A circular wire basket on the bottom shelf to hold towels and aprons.
Building Supplies Needed
- Five 2×6 boards of choice- I used untreated pine that cost about $6 each at a local hardware store
- Four 24-inch pre-cut black steel 3/4 inch pipes
- Four 12-inch pre-cut black steel 3/4 inch pipe
- Four 4-inch pre-cut black steel 3/4 inch pipe (see note below before ordering)
- One 36-inch pre-cut black steel 3/4 inch pipe
- Six black 3/4 inch pipe tee joints
- Eight 3/4 inch black steel floor flange
- 1.5 inch pocket screws
- Two 2-hole tube straps
- 32 1.5 inch wood screws
- Pocket hole jig system
- Wood glue
- An electric drill
Total, all the supplies cost me $113.94. (I already had a drill, wood glue, and a pocket jig.)
Coffee Station Instructions
The directions will vary based on the size table/bar you want. Mine ended up being 4 feet wide, 17 inches deep, and about 40 inches tall (slightly higher than counter height). You could adjust the same concept to almost any size table, so vary according to your needs.
Before you begin, sketch out the size table you want and double check all of your supplies and measurements. If you want a deeper table (more than 17 inches), you’ll need to make the internal frame a little wider. Replace the four inch pipes with whatever size you need to work with your size requirements. Four inch was perfect for the 17-18 inch but a 24-30 inch would probably need six inch pipes, etc.
Step 1: Cut the Boards
I only had about 4 feet on the wall where I wanted the table, which made it easy. The 2×6 boards came in 8-foot runs, so cut in half I had ten 4-foot pieces. I only needed 9 of the 10 pieces. This way, each of the three layers was made of three 4-foot 2×6 boards.
Step 2: Stain the Boards (If Staining) & Seal Them
I decided to stain at this stage, rather than try to stain after each shelf was assembled. This way, the stain wouldn’t pool and be darker between the boards. I put some tarps and old sheets on my floor and stained indoors because it was freezing outside!
(Note: I was fine doing this inside, because I was using a non-toxic method of staining and weathering. I would never do this with regular stains or paints! This is the stain I used that uses steel wool, vinegar, and tea.
Note: I also sealed the wood with a natural sealant before using it. Since it was being used for making hot liquids on a daily basis, this was important. To keep things simple, I whipped up a natural furniture wax from beeswax and olive oil and I’ll share that recipe soon. Plain olive oil also seems to work well. I waited until the table was assembled and gave the wood about a week to fully dry and finish changing color from the stain before sealing.
Step 3: Screw the Boards Together
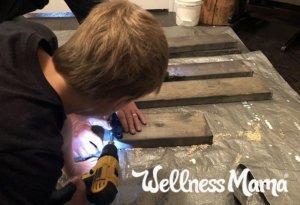 Again, I’m not the best with power tools and I knew that trying to screw boards together at an angle freehand was doomed to fail. At the recommendation of Live Simply, I used a pocket hole jig system to pre-drill and screw together the boards. I placed one screw every 11-12 inches and used wood glue before screwing them together.
This produced three 16.5-inch by 4 foot shelves. (And if you’re wondering, like I did for a long time, why the math doesn’t make sense? A 2×6 board is actually 1.5×5.5 … I know… strange!)
Step 4: Assemble the Frame
Next, I assembled the H-shaped frame out of the steel pipes. Note that it is important to, as much as possible, screw all the pipes together the same number of turns to keep things symmetrical.
To start, I screwed on a “Tee” brace to each end of the 36-inch long pipe (the bottom of the T). Then, I screwed a 4-inch pipe on to each end of the Tee brace. At this stage it look like a very long “I” and should lay flat on the floor.
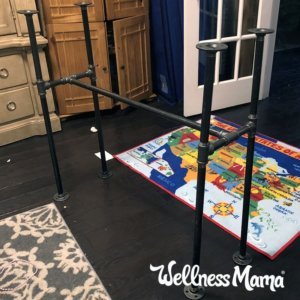 Then, I added the single end of a tee brace to each four inch pipe, but turned them to face the opposite direction. This becomes the middle part of the frame. When placed on a flat surface, all four tee braces should touch the ground and none of the other pipes should.
The next step depends on the height table you want and if you want the top or bottom shelf to be taller. I wanted a shorter top shelf so I could keep baskets with tea and coffee. A larger shelf on the bottom provides a place for linens and jars. To create this, I added a 12-inch pipe to the top of each tee brace and a 24-inch pipe to the bottom of each tee brace.
Finally, to the top of each of these 12 and 24-inch pipes I added a flange. These flanges get mounted to the bottom and top shelves and form the full frame of the table.
Step 5: Drill Holes in the Middle Shelf
I temporarily removed the top 12-inch black pipes and flanges so I could mark the places for the holes in the middle shelf. TIP: Make sure everything is level and symmetrical before doing this step!
Next, I placed the shelf on the middle part of the frame and drew circles where the holes needed to be. The holes go on the underside of the shelf. To make the shelf lay flat, drill a 1.5 inch hole halfway through the board first and then drill a 1.25 inch hole the rest of the way.
The shelf should now fit onto the holes and lay flat. Screw the 12-inch pieces with flanges back on.
Step 6: Attach Bottom and Top Shelves
Now, use wood screws to attach the bottom and top shelves. I learned the hard way: level as you go and you may need to rotate the flanges to get everything level.
The last step is to attach the middle shelf with a couple of tube straps on the under side of the shelves.
Step 7: Make Coffee (or Tea)
Voila! Coffee bar complete. Make some coffee or tea and enjoy. Alternately, this would also make a great wine or cocktail bar as well.
Next up, I hope to make a set of wall-mounted shelves as well as some sliding barn doors that will match this industrial/farmhouse look. (Update: I did it! See the finished industrial shelves here and the barn door here (and of course how to make your own!).
Have you ever built DIY furniture for your home? How did it turn out?
Leave a Reply